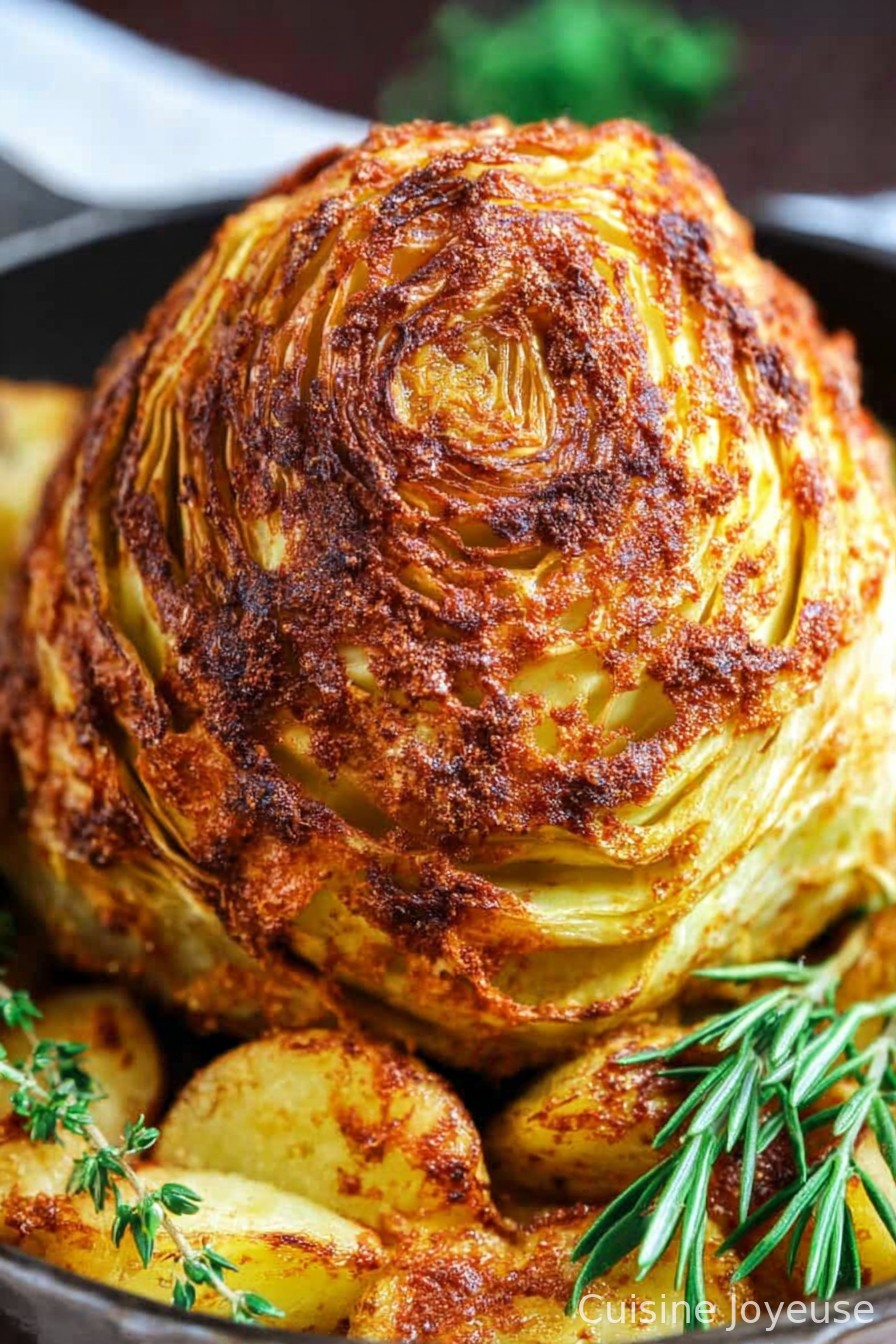
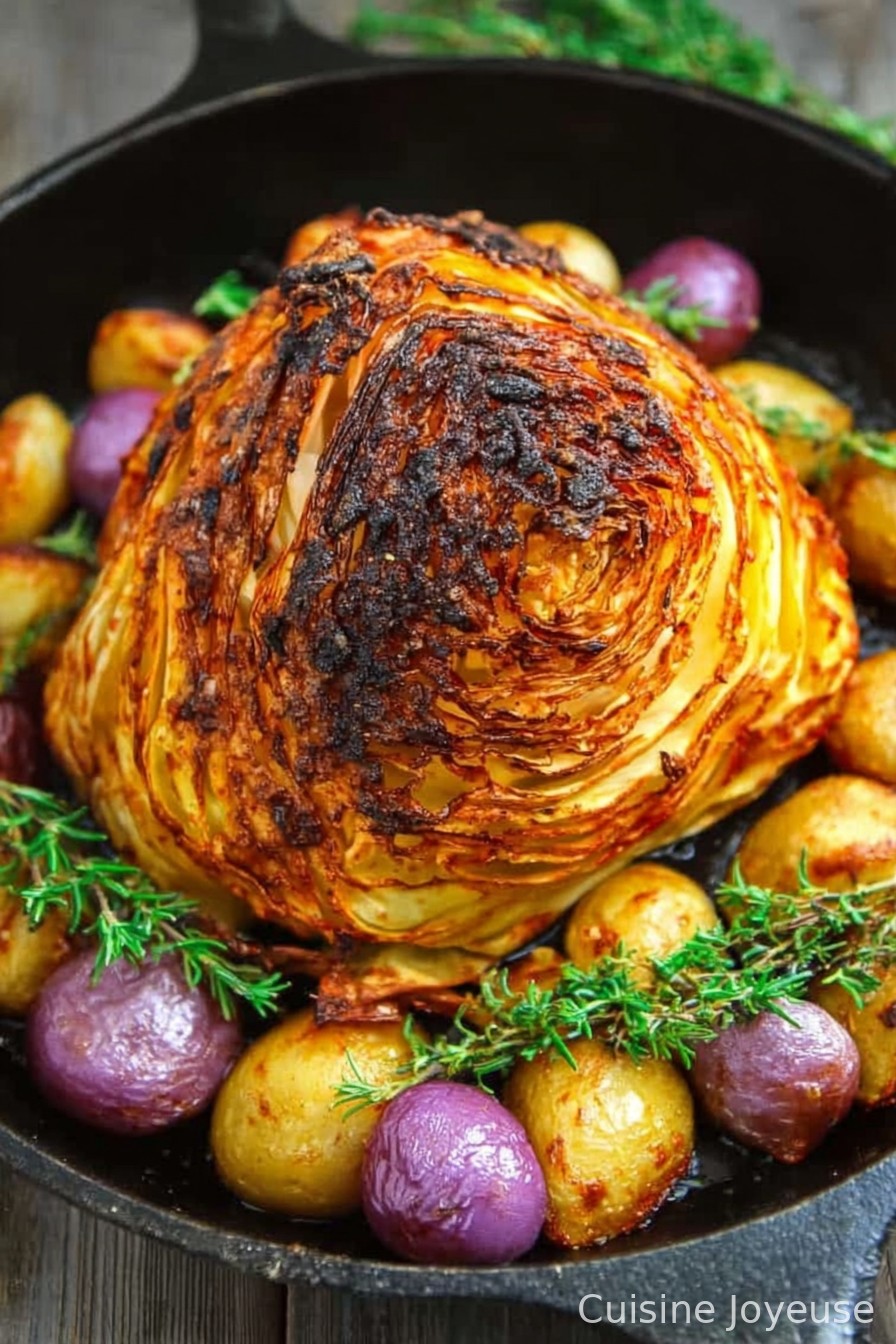
Whole Roasted Cabbage
Let Me Tell You About Whole Roasted Cabbage
Alright, friend, so you know how sometimes you land on a veggie side that’s so low-effort it almost feels like cheating? That’s how it was for me the first time I tried whole roasted cabbage. I’m not saying it changed my life or anything—let’s not get carried away—but it absolutely turned the humble cabbage into something cozy, sort of sweet, and, dare I say, almost elegant. First time I made it, my kid tugged on my sleeve to ask if I’d baked a cake (it did smell a bit, well, buttery). I don’t usually tell people cabbage is my favorite vegetable, but this recipe gets it close. And hey, nothing against steamed cabbage, but this is… very much not that.
Why You’ll Actually Want to Make This
I pull this trick out when I’m feeling lazy but need something fun to go with dinner. My family goes bonkers for this because, for reasons I can’t quite explain, a cabbage roasted in one big hunk just feels fancier than a bowl of chopped greens. (And the magic really happens at the table when you cut into it and everyone pretends it’s some kind of roast beast; no apologies for dad jokes.)
I also love it when I’m already roasting something else—just pop the cabbage in and forget about it. I used to worry the outer leaves looked too crispy, but now I eat those bits first.
What You Need (And What You Can Totally Improvise)
- 1 whole green cabbage (about 2 pounds, but honestly, grab whatever fits your roasting tin—purple works too though it’s a bit firmer)
- 3 tablespoons olive oil (or melted butter if you’re feeling wild; I swap in avocado oil when I run out of olive)
- 1 1/2 teaspoons flaky salt (but regular table salt is fine—I won’t tell)
- 1/2 teaspoon freshly ground black pepper (honestly, just eyeball it)
- 1 teaspoon smoked paprika (sometimes I skip this and use plain sweet paprika or a pinch of chili powder instead—my gran used to reach for Lawry’s)
- 2 cloves garlic, minced (I’ve used garlic powder in a pinch, but fresh makes me feel like a pro)
- 1 tablespoon apple cider vinegar (optional—sometimes I just use a squeeze of lemon right at the end but whatever’s knocking about in the fridge)
How To Get Roasty, Toasty Cabbage (Don’t Rush It!)
- Preheat your oven to 400°F (200°C). Don’t skip this! One time I did and the cabbage just sort of wilted instead of roasted. It’s not the same.
- Peel any gnarly or tough outer leaves off your cabbage. Trim the stem just enough so it sits flat—but don’t cut it out entirely or the whole thing falls apart (yeah, I learned that the hard way). Give it a quick rinse if it’s got dirt clinging on.
- Whisk the olive oil, salt, pepper, paprika, and minced garlic together in a mug or small bowl. Pour or brush (I use my hands—less fancy but faster) this all over the cabbage, working it into the layers where you can. Nobody likes dry cabbage.
- Set the cabbage in a roasting tin or Dutch oven. Pour about 1/4 cup water into the bottom—this is the trick for tender leaves without burning the outside (adding wine instead of water is a nifty upgrade, but I usually forget).
- Pop the whole business into the oven, uncovered. Roast for 1 hour 20 minutes, give or take—turn it halfway so it bronzes evenly. If it looks like it’s catching too much, tent it with foil. But honestly, I like the crispy edges.
- Check the center with a skewer or small knife; it should slide in easily. If it’s fighting you, keep roasting in 10-minute bursts—don’t worry if it’s a bit charred outside, that’s flavor!
- Drizzle the cabbage with apple cider vinegar (or lemon juice) while it’s still hot. This is where the magic happens (and also where I usually sneak a taste).
- Let it cool for 10 minutes. Slice into fat wedges and serve warm—sometimes I scatter fresh herbs over, but usually I can’t be bothered and it’s still great.

Stuff I’ve Figured Out Along the Way
- Once, I tried skipping the water, and the bottom practically turned to charcoal before the inside cooked—don’t do that unless you like, you know, burnt cabbage vibes.
- If you swap in red cabbage, just add another 10-15 minutes roasting. Or toss it with a teensy pinch of sugar—brings out sweetness!
- Oil first, then salt—the salt helps draw moisture to the surface so things crisp up, but sometimes I forget this order and, honestly, it’s usually just fine.
What Happens If You Tinker (AKA Variations That Worked…and One That Did Not)
- If you’re bold, add a little curry powder to the oil. Or, sprinkle shredded cheese over the last 15 minutes. Both are wins.
- One time I tucked a whole apple inside the core, thinking it would add sweetness. All it really did was turn the apple to mush. Lesson learned! I’d skip that one.
- Sometimes I roast it with a scattering of caraway seeds or fresh dill. Probably not for everyone, but I like the Nordic twist.
On Equipment (Don’t Stress It)
A heavy roasting tin or Dutch oven works best, but I’ve shoved it into a cheap cake tin before and nothing exploded. If you don’t have a basting brush for the oil, just use your hands. Bonus: fewer dishes.
Keeping & Storing
Whole roasted cabbage keeps in the fridge for about 3 days, snugged in an airtight container. The edges go a bit softer, but I actually think it tastes even better the next day when everything melds—though, honestly, in my house it never lasts more than a day because apparently this is what counts as ‘irresistible’ for my crew.
How I Like To Serve It
I usually slice it into hefty wedges and serve with a dollop of Greek yogurt and a squeeze of lemon. But if I’m feeling extra, a drizzle of tahini or a gob of Dijon mustard is amazing. My brother eats it cold, straight from the fridge, but he’s always been the oddball. Oh, and at least once a year I use it as a bed for roast chicken—makes a tidy little feast.
Things I Wish I’d Known (Pro Tips)
- I once tried roasting it faster at a really high temp, and it just singed the outer leaves but left the inside raw. Don’t do what I did—slow and steady wins here!
- If you forget to turn the cabbage halfway, it’ll be darker on one side, but that’s part of the charm (or that’s what I tell myself).
- Actually, I find it works better if you drizzle extra oil towards the end if the outer leaf looks dry—gives you both crispy and juicy bits.
FAQ From Folks Who’ve Actually Asked
- Can I make this vegan? Oh, for sure! Just stick to olive oil instead of butter. Easy peasy.
- How do I get it really tender in the middle? Don’t rush the roast—let it go the full time, and check with a knife. If it’s still tough, cover with foil and keep going. Slow and steady actually matters here.
- What if I want to make it spicy? Toss in a sprinkle of chili flakes or hot smoked paprika. Or even a squeeze of sriracha at the table—that’s what my neighbor does, and it’s proper tasty.
- Can I add other veggies to the tin? Eh, you can, but remember things like carrots or potatoes take longer than you’d think. I sometimes add halved shallots or garlic cloves—they’re good but not essential.
- Does this freeze well? Not really, to be honest. The texture gets odd after defrosting. Best eaten fresh or cold from the fridge with a fork next day.
Oh, one last random thing—I once brought this to a potluck and someone thought it was a giant sourdough until I started carving it up. So if you want to confuse your friends, this is your recipe.
Ingredients
- 1 whole green cabbage (about 2 pounds, but honestly, grab whatever fits your roasting tin—purple works too though it’s a bit firmer)
- 3 tablespoons olive oil (or melted butter if you’re feeling wild; I swap in avocado oil when I run out of olive)
- 1 1/2 teaspoons flaky salt (but regular table salt is fine—I won’t tell)
- 1/2 teaspoon freshly ground black pepper (honestly, just eyeball it)
- 1 teaspoon smoked paprika (sometimes I skip this and use plain sweet paprika or a pinch of chili powder instead—my gran used to reach for Lawry’s)
- 2 cloves garlic, minced (I’ve used garlic powder in a pinch, but fresh makes me feel like a pro)
- 1 tablespoon apple cider vinegar (optional—sometimes I just use a squeeze of lemon right at the end but whatever’s knocking about in the fridge)
Instructions
-
1Preheat your oven to 400°F (200°C). Don’t skip this! One time I did and the cabbage just sort of wilted instead of roasted. It’s not the same.
-
2Peel any gnarly or tough outer leaves off your cabbage. Trim the stem just enough so it sits flat—but don’t cut it out entirely or the whole thing falls apart (yeah, I learned that the hard way). Give it a quick rinse if it’s got dirt clinging on.
-
3Whisk the olive oil, salt, pepper, paprika, and minced garlic together in a mug or small bowl. Pour or brush (I use my hands—less fancy but faster) this all over the cabbage, working it into the layers where you can. Nobody likes dry cabbage.
-
4Set the cabbage in a roasting tin or Dutch oven. Pour about 1/4 cup water into the bottom—this is the trick for tender leaves without burning the outside (adding wine instead of water is a nifty upgrade, but I usually forget).
-
5Pop the whole business into the oven, uncovered. Roast for 1 hour 20 minutes, give or take—turn it halfway so it bronzes evenly. If it looks like it’s catching too much, tent it with foil. But honestly, I like the crispy edges.
-
6Check the center with a skewer or small knife; it should slide in easily. If it’s fighting you, keep roasting in 10-minute bursts—don’t worry if it’s a bit charred outside, that’s flavor!
-
7Drizzle the cabbage with apple cider vinegar (or lemon juice) while it’s still hot. This is where the magic happens (and also where I usually sneak a taste).
-
8Let it cool for 10 minutes. Slice into fat wedges and serve warm—sometimes I scatter fresh herbs over, but usually I can’t be bothered and it’s still great.
Approximate Information for One Serving
Nutrition Disclaimers
Number of total servings shown is approximate. Actual number of servings will depend on your preferred portion sizes.
Nutritional values shown are general guidelines and reflect information for 1 serving using the ingredients listed, not including any optional ingredients. Actual macros may vary slightly depending on specific brands and types of ingredients used.
To determine the weight of one serving, prepare the recipe as instructed. Weigh the finished recipe, then divide the weight of the finished recipe (not including the weight of the container the food is in) by the desired number of servings. Result will be the weight of one serving.
Did you make this recipe?
Please consider Pinning it!