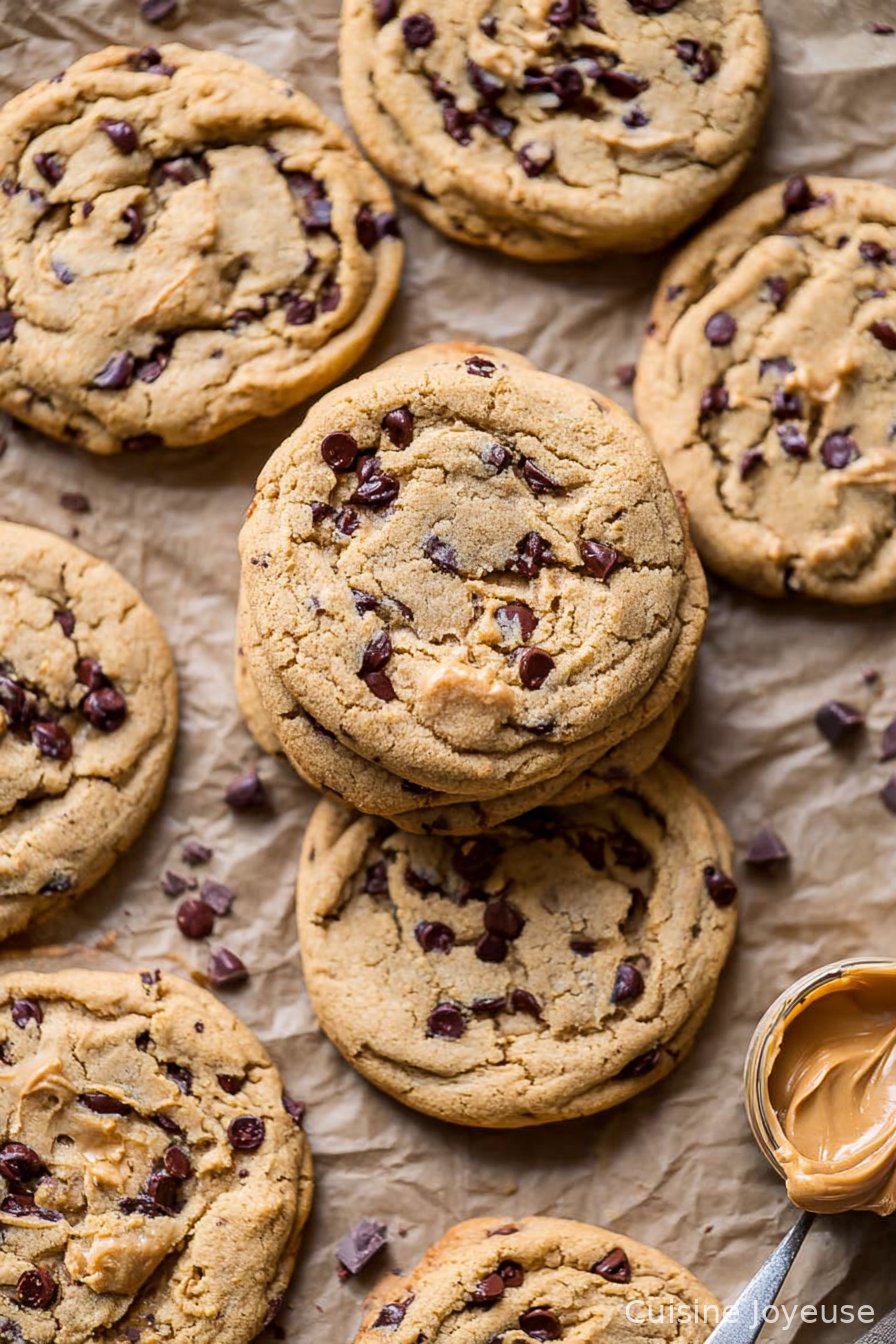
Peanut Butter Chocolate Chip Cookies
Peanut Butter and Chocolate: The Cookie Combo That Never Lets Me Down
Alright, confession time—these Peanut Butter Chocolate Chip Cookies are what I make when I’m craving something sweet but also pretending I’m being responsible because, hey, peanut butter is protein, right? Anyway, the first time I baked these was actually because I forgot to buy eggs (classic me), and I just sort of…winged it. The house smelled so good my neighbor literally popped by “just to see how I was doing”—which, of course, meant she left with half the batch. That’s fine. Sharing cookies is basically my love language. Also, once, I did try to double the batch and ended up with a peanut butter avalanche–I’ll explain later.
Why You’ll Love This Recipe (Or, Why I Keep Making It)
I make these whenever I want to impress people with minimal effort. My family goes nuts for them—well, peanuts, technically—even my aunt who claims she doesn’t really “do” sweets (she’s lying, but we let her have her little act). Actually, I used to struggle with them being too crumbly, but a bit of experimentation (and grumbling) fixed that. Plus, they make the kitchen smell like happiness—if happiness had a smell, it’d be warm cookies and maybe a bit of burnt sugar if you forget the timer (ask me how I know…).
What You’ll Need (And What to Swap If You’re Low on Stuff)
- 1 cup creamy peanut butter (I usually just grab whatever’s in the pantry—sometimes it’s store-brand, sometimes Skippy. Grandma insisted on Jif, but hey, it’s all good.)
- 1/2 cup packed brown sugar (or white sugar in a pinch; your cookies will be a bit crispier though)
- 1 large egg (I’ve used a flax egg before and it worked surprisingly well, though the texture is a bit different)
- 1 teaspoon vanilla extract (I eyeball it, honestly. A splash, a dash, whatever strikes your mood.)
- 1 cup chocolate chips (milk, dark, or even peanut butter chips if you’re really leaning in. I do a mix when I’m feeling wild.)
- 1/2 teaspoon baking soda (don’t skip this even if you’re tempted, trust me—it makes a difference)
- Pinch of salt (unless your PB is already salty, then maybe just a smidge)
How I Actually Make These (aka Directions, Kind Of)
- Preheat your oven to 350°F (about 180°C, but honestly, my old oven’s dial is a liar so I just aim for “hot but not scorching”). Line a baking tray with parchment or just grease it if you’re out—either works.
- In a big-ish bowl, mix together the peanut butter and sugar until it looks smooth. This is where I usually sneak a spoonful—quality control, obviously.
- Crack in the egg and dump in the vanilla. Stir it until everything’s kinda glossy and uniform. Don’t worry if it looks a bit greasy at this point—it always does!
- Add the baking soda and salt. Mix again. The dough thickens a bit now (and if you don’t have much arm strength, this is your workout for the day).
- Toss in the chocolate chips and stir so they’re all cozy in the dough. If you’re using a hand mixer, be gentle or you’ll fling chips across the room—voice of experience here.
- Roll the dough into balls, about the size of a walnut or, if you’re me, slightly bigger because “small cookies are sad cookies.” Place them on your tray with a bit of space.
- Use a fork to press them down a bit and make that classic criss-cross pattern. Or don’t. Sometimes I skip it if I’m in a hurry and, honestly, no one complains.
- Bake for 9 to 12 minutes, till the edges look set but the middle’s still soft. They’ll firm up as they cool, I promise. Don’t overbake unless you like crunchy cookies.
- Let them cool on the tray for a few minutes (so they don’t fall apart), then move to a rack. Or straight to your mouth. Dealer’s choice.
Notes (aka What I Learned the Hard Way)
- If your peanut butter is super oily, give it a good stir first or the cookies might spread too much. (Been there, got the flat cookie pancake to prove it.)
- Sometimes I add a handful of oats for a bit of chew—I think it works better with old-fashioned oats, but quick oats are fine if that’s all you’ve got.
- The dough freezes pretty well, but I’d recommend rolling into balls before freezing—otherwise, it’s a nightmare trying to scoop rock-hard dough (ask me how I know…again).
My Cookie Experiments (A Few Variations)
- Once, I swapped in almond butter instead of peanut. Good, but not quite the same—just a heads-up if you’re thinking of trying it.
- Mini M&Ms instead of chocolate chips? Works, but you end up chasing them around the bowl. Still, kids love the colors.
- One time I tried to add shredded coconut. Would not recommend unless you love coconut; it kind of overwhelmed everything else.
Equipment (And Sneaky Workarounds)
- Mixing bowl (big enough for enthusiastic stirring)
- Wooden spoon or hand mixer (your call—sometimes I use a fork if everything else is dirty, and it’s…passable)
- Baking tray (if you don’t have parchment, just grease it with a dab of butter or oil)
- Cooling rack is ideal, but honestly, a clean tea towel on the counter works in a pinch

How To Store Them (If You Have Any Leftover)
Okay, so these will keep in an airtight container for 2 to 3 days, but honestly in my house they never last more than a day! If you stash them in the fridge, they get a tad firmer (not a bad thing, just different), and you can freeze them for a few weeks. But let’s be real…you’ll eat them before you even think about storage, probably while standing over the kitchen sink (no judgment).
How I Like To Serve These Cookies
Honestly, still warm with a big glass of cold milk is how I grew up having them, but if I’m feeling fancy I sandwich a scoop of vanilla ice cream between two cookies. Sometimes we dunk them in coffee (my cousin says I’m a monster for this, but what does she know?). Oh, and if you want to get inspired, Sally’s Baking Addiction has a killer recipe too—hers are a bit fluffier if that’s your thing.
Lessons Learned (So You Don’t Have To Repeat My Mistakes)
- I once skipped the cooling time and ended up with cookie crumbles all over the place. Let them set up for a few minutes—just trust me on this one.
- If you try to cut the sugar much, the cookies get weirdly dry. I wanted to feel virtuous but wound up with sad little pucks. Just let cookies be cookies!
- Another time, I tried baking two trays at once—bad idea unless your oven heats perfectly evenly (mine doesn’t; the back left corner is basically a broiler). Now I just do them one tray at a time and watch a funny cat video while I wait. Priorities.
FAQ (Real Questions, Real Answers)
- Can I make these gluten-free? Yup! There’s no flour in the base recipe, so they’re already gluten-free. Just double-check your baking soda and chocolate chips—most are fine, but always worth a look.
- How do I make them chewier? Try adding a spoonful of oats or don’t overbake. Actually, I find pulling them out when the middle looks a tiny bit underdone works best for chewy centers!
- Is natural peanut butter okay? It is, but give it a good stir so the oil’s mixed in—otherwise you’ll get super flat cookies. Learned that the hard way, as you can imagine.
- Can I use crunchy peanut butter? Absolutely! You’ll get a bit more texture. I do this when my husband’s around—he says it “feels more artisanal.”
- Any tips for egg-free? Flax egg works (1 tbsp ground flax + 3 tbsp water, let it sit ‘til thickened), but the cookies are a tad softer. Not a bad thing, just different.
If you want more peanut butter dessert ideas, King Arthur Baking has some neat twists. I sometimes get inspiration there, especially when I’m feeling a bit cookie-weary (is that even a thing?).
So there you go—my very un-fancy, totally satisfying peanut butter chocolate chip cookies. Hope you enjoy baking (and eating) them as much as we do. And if you make a mess, well, consider it a badge of honor. Happy cookie-ing!
Ingredients
- 1 cup creamy peanut butter
- 1/2 cup unsalted butter, softened
- 1 cup brown sugar, packed
- 1/2 cup granulated sugar
- 2 large eggs
- 1 teaspoon vanilla extract
- 1 1/2 cups all-purpose flour
- 1 teaspoon baking soda
- 1/4 teaspoon salt
- 1 cup semi-sweet chocolate chips
Instructions
-
1Preheat the oven to 350°F (175°C) and line two baking sheets with parchment paper.
-
2In a large bowl, cream together the peanut butter, softened butter, brown sugar, and granulated sugar until light and fluffy.
-
3Beat in the eggs one at a time, then add the vanilla extract and mix until combined.
-
4In a separate bowl, whisk together the flour, baking soda, and salt. Gradually add the dry ingredients to the wet mixture and mix until just combined.
-
5Fold in the chocolate chips. Drop tablespoon-sized balls of dough onto the prepared baking sheets, spacing them about 2 inches apart.
-
6Bake for 10-12 minutes, or until the edges are lightly golden. Allow cookies to cool on the baking sheet for 5 minutes before transferring to a wire rack to cool completely.
Approximate Information for One Serving
Nutrition Disclaimers
Number of total servings shown is approximate. Actual number of servings will depend on your preferred portion sizes.
Nutritional values shown are general guidelines and reflect information for 1 serving using the ingredients listed, not including any optional ingredients. Actual macros may vary slightly depending on specific brands and types of ingredients used.
To determine the weight of one serving, prepare the recipe as instructed. Weigh the finished recipe, then divide the weight of the finished recipe (not including the weight of the container the food is in) by the desired number of servings. Result will be the weight of one serving.
Did you make this recipe?
Please consider Pinning it!!