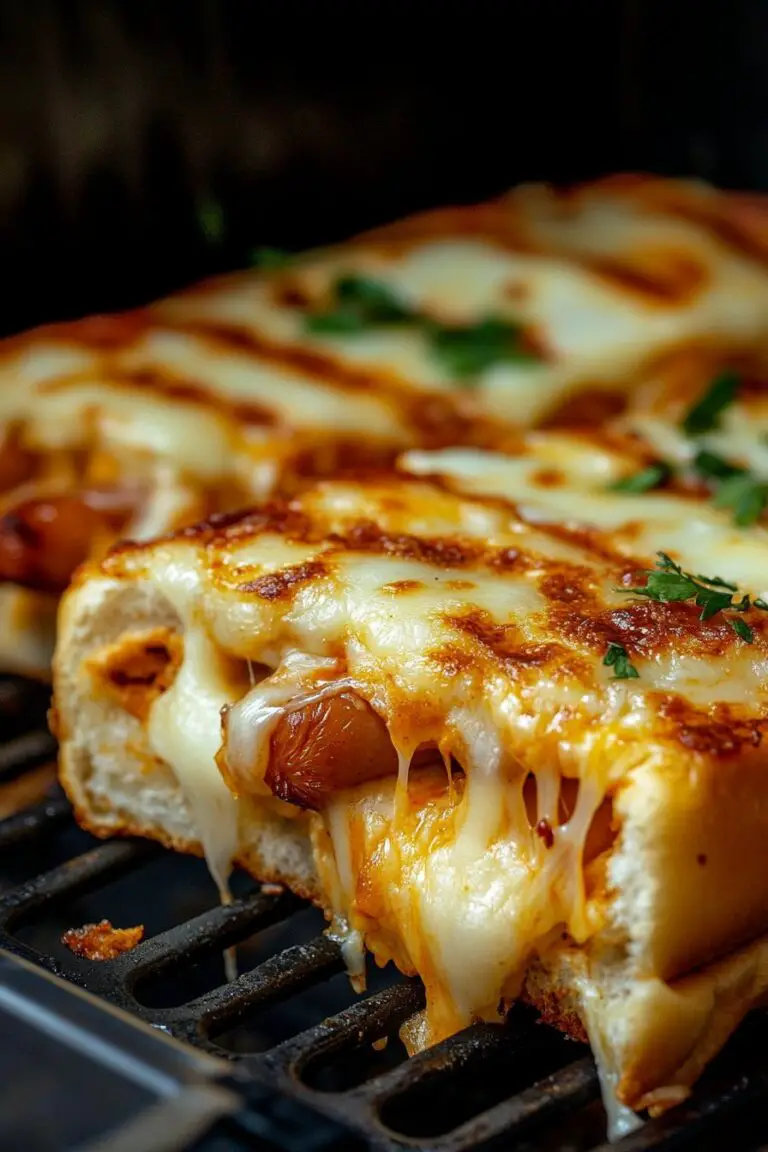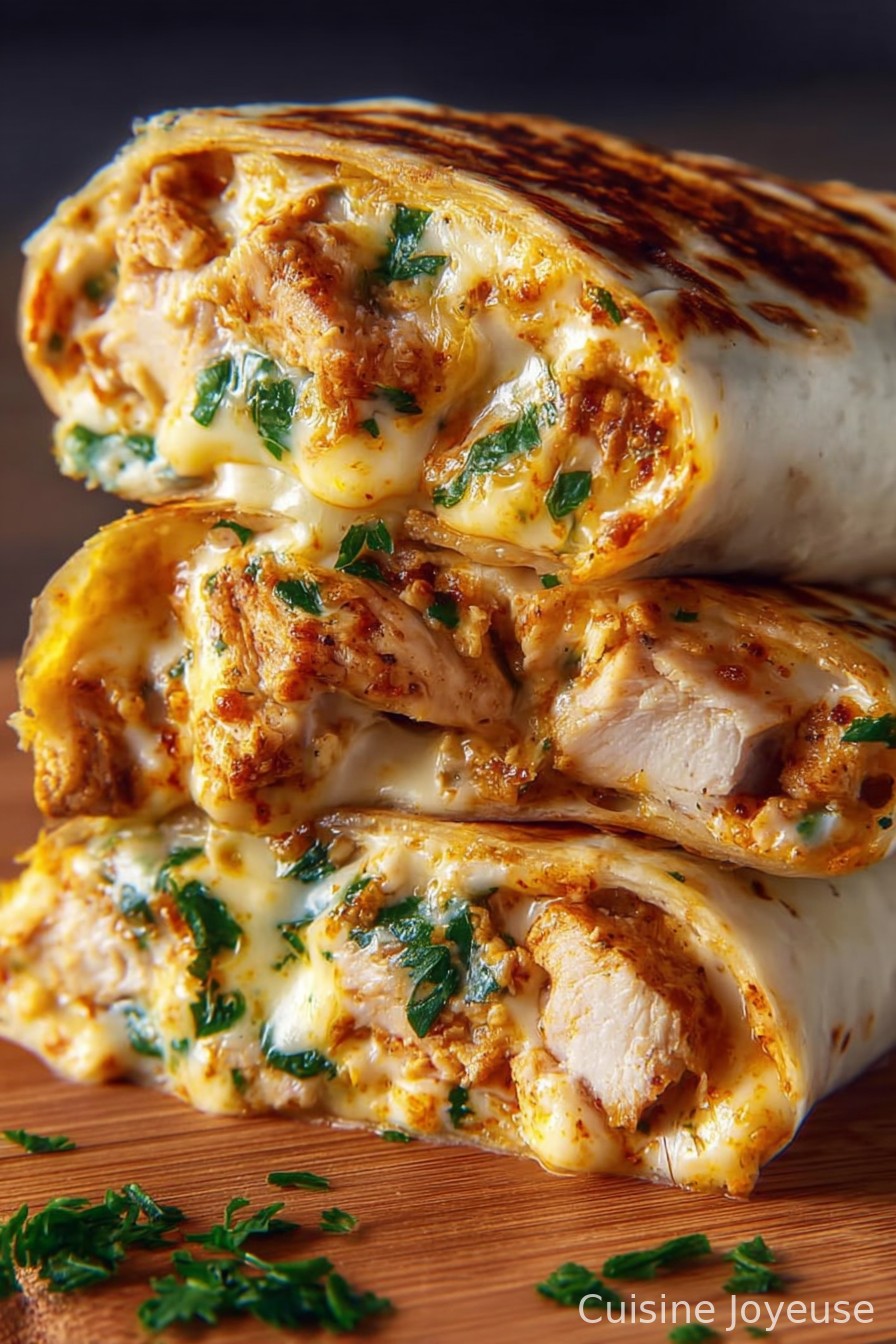
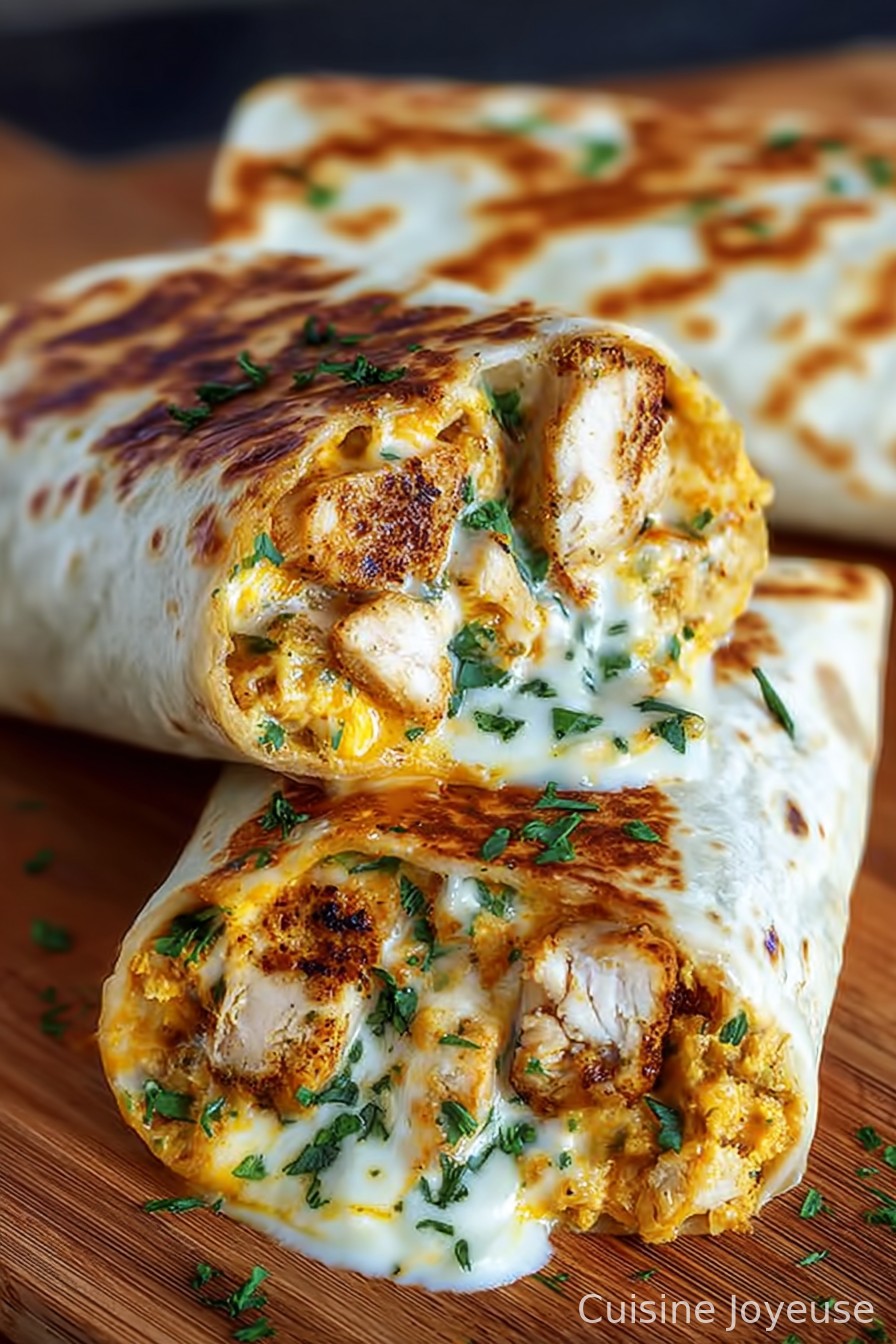
Ooey-Gooey Cheesy Garlic Chicken Wraps
Alright, if you ever find yourself shuffling through the fridge at 6:30pm thinking, “What’s for dinner (again)?,” these Ooey-Gooey Cheesy Garlic Chicken Wraps are pure gold. First time I made these, it was mostly desperation—leftover roast chicken, cheese on the edge of its life, a forgotten bulb of garlic, and some wrinkled tortillas. I thought, why not throw them all together? Let’s just say, even my pickiest eater abandoned her usual negotiation tactics. Funny thing is, I still didn’t write the recipe down until my mate Lucy texted at midnight for the “cheesy chicken thingy.” And before you ask, yes, you’ll probably want seconds.
So, why do I keep coming back to this?
I make this when I need a dinner win. You know, the type where people hover around the oven saying “Is it ready yet?” My family goes a bit mad for this (and so do I, if I’m honest) because it’s simple and so comforting. Plus, that cheese pull—seriously, who can resist? There’s also something about garlic that just makes it smell like you know what you’re doing in the kitchen, even if you’re just winging it. The only trouble I’ve had was getting wraps crispy enough but not burned—finally realized patience is my friend here (not my strongest suit, ha!).
What you’ll need (plus my lazy swaps)
- 2 cups cooked chicken—rotisserie works, or I’ve shredded leftover roast or, in a pinch, just cooked up supermarket chicken fillets
- 1 to 2 cups shredded cheese—mozzarella is the classic, but cheddar or a mix works. (Had a go with gouda once, not bad)
- 4 large flour tortillas—sub in whole wheat if you’re feeling healthy; I’ve even used naan in emergencies
- 4 cloves garlic, minced—sometimes I swap one for a little garlic powder if I can’t be bothered
- 2 tablespoons butter (or olive oil—Grandad insisted on Kerrygold but I honestly just use whatever’s in the fridge)
- Salt and black pepper—to taste
- Fresh herbs, like parsley or chives (optional—mostly I forget)
- Optional: A handful of baby spinach or arugula for sneaking greens past the kids
How I throw these together
- Get your fillings going: Melt the butter in a big skillet over medium heat. Toss in that garlic—minute or two just til it smells amazing. (Don’t walk away! Burnt garlic is just sad.) Add in your chicken, a little salt and pepper. Give it a toss so everyone gets coated in butter and garlic. This is where I usually sneak a bite for, uh, quality control.
- Add cheese: Off the heat, mix in most of your shredded cheese, saving a handful for later. If you’re adding greens or herbs, now’s the time. Give it a good stir. It’ll look stringy and messy. Don’t stress, that’s normal.
- Wrap it up: Lay out your tortillas. Spoon a quarter of the mixture down the middle of each. Sprinkle the extra cheese on top (because of course). Fold in the sides and roll them up pretty tightly—if stuff falls out, just eat it, no one’s judging.
- Crisp them up: Wipe out the skillet unless you like a little more butter flavor (I do). Medium heat again, a little extra butter or oil if it looks dry. Place the wraps seam-side down—this helps them stay closed. Cook 2–4 mins each side till they’re golden and the cheese is melting out the sides a bit—ravishing. If they look odd at this stage, don’t panic—they’ll crisp up brilliantly.
Notes: Stuff I learned the hard way
- If you overfill, they’ll pop open and everything oozes out—so yeah, less is sometimes more (learned this after three straight ooey gooey messes).
- Mozzarella is dreamy but can be bland. A sharp cheddar kick never hurts. Honestly, use what you have.
- If your tortillas are a bit stale, microwave them for ten seconds under a damp paper towel—they’ll work fine.
- If you need a dairy-free version, there are actually some shockingly decent vegan cheeses these days. My cousin Joe swears by this Serious Eats vegan cheese roundup if that’s your thing.
Some twists (and one flop)
- Added chopped jalapeños and a splash of lime once—absolutely gorgeous, little Tex Mex edge.
- Did a BBQ chicken version—used BBQ sauce in the filling in place of half the butter. Family loved that. But I think it’s actually a bit sweet—your mileage may vary.
- I once tried using rye wraps. Bit of an odd flavor, not my favorite (and the kids staged a mini-uprising).
What you need—don’t stress if you’re missing something
- Skillet or frying pan—nonstick is easier, but cast iron gives better crispiness.
- Spatula—mine is almost always hiding, so a butter knife and tongs combo’ll do in a pinch.
- A grater (box, microplane, or just buy pre-shredded—life’s too short)
Keeping leftovers (but will you have any?)
Okay, I store leftovers (on the rare occasion there’s any) in an airtight container in the fridge. They reheat pretty well in the oven, 180°C/350°F for 10 minutes, or in a skillet til crispy again. Though honestly, in my house, these never last more than a day—one time I thought there were two left for lunch; turned out my partner sneakily nabbed them at midnight. Classic.
How we like to serve ’em
These wraps are dynamite with a side salad—if I’m feeling virtuous. Sometimes chips, or even just a pickle spear if I’m feeling too lazy to fuss. I’m partial to dipping them in a bit of spicy mayo or, if you want to get fancy, a swirl of green goddess dressing like the one from Bon Appetit. Fridays we sometimes eat them picnic style on the living room floor; adds a bit of fun.
Pro tips: what I wish I’d known sooner…
- I tried to rush the crisping step once and ended up with pale, floppy wraps. Don’t do it—give them time (3–4 mins per side, really does the trick).
- Actually, I find letting the finished wraps rest a minute before slicing helps keep the filling from falling out all over the place. You live, you learn.
Your burning questions answered
- Can I use raw chicken? Eh, you’d have to cook it first anyway. Otherwise, it’ll be seriously underdone. Leftover chicken’s fastest.
- Any way to make them gluten-free? You bet, just grab your fave gluten-free tortillas. (I’ve used corn wraps before—the texture is different but it works.)
- Can I freeze these wraps? For sure—just wrap tightly in foil or cling film, and freeze. They might get a bit less crispy after reheating, but hey, still tasty. The cheese gets a little firmer, but it’s fine in a pinch.
- What’s the best cheese? Depends who you ask! I lean toward mozzarella/cheddar. My mate Emily goes full pepper jack. Go wild.
- How do I keep them from breaking apart? Don’t overstuff, and you’ve really gotta make sure to crisp seam-side down first—it sort of seals everything in (it took me three tries to realize that, ha!)
- Can I make this ahead? Yep. Assemble, refrigerate (uncooked), and then crisp up just before eating. Actually, I think this tastes better the next day, but that might just be me.
Oh! Quick digression: If you haven’t tried making homemade flour tortillas, it’s actually pretty fun. Maybe not practical for a Tuesday, but if you want to get a bit experimental, I recommend this Simply Recipes tortilla guide. Does it make the wraps better? Debatable. But it’s a laugh.
All told, these Ooey-Gooey Cheesy Garlic Chicken Wraps hit the spot whether you’re feeding a hungry mob or just want an easy, warm meal that feels like a hug. Give ’em a go—and let me know if you find a new combo that knocks my socks off (not literally, but you know what I mean).
Ingredients
- 2 cups cooked chicken breast, shredded
- 1 1/2 cups shredded mozzarella cheese
- 1 cup shredded cheddar cheese
- 4 large flour tortillas
- 4 cloves garlic, minced
- 2 tablespoons unsalted butter
- 1/4 cup chopped fresh parsley
- 1/2 teaspoon salt
- 1/4 teaspoon black pepper
Instructions
-
1In a small skillet over medium heat, melt butter. Add minced garlic and sauté until fragrant, about 1 minute. Remove from heat and mix in chopped parsley.
-
2In a large bowl, combine shredded chicken, mozzarella, cheddar, salt, pepper, and half of the garlic-parsley butter. Mix until evenly coated.
-
3Lay out the tortillas and evenly divide the chicken-cheese mixture among them. Roll up each tortilla tightly to form wraps.
-
4Heat a non-stick skillet or grill pan over medium heat. Place wraps seam-side down and cook for 2-3 minutes per side or until golden brown and cheese is melted.
-
5Brush the tops of the wraps with the remaining garlic-parsley butter before serving. Serve hot and enjoy.
Approximate Information for One Serving
Nutrition Disclaimers
Number of total servings shown is approximate. Actual number of servings will depend on your preferred portion sizes.
Nutritional values shown are general guidelines and reflect information for 1 serving using the ingredients listed, not including any optional ingredients. Actual macros may vary slightly depending on specific brands and types of ingredients used.
To determine the weight of one serving, prepare the recipe as instructed. Weigh the finished recipe, then divide the weight of the finished recipe (not including the weight of the container the food is in) by the desired number of servings. Result will be the weight of one serving.
Did you make this recipe?
Please consider Pinning it!!