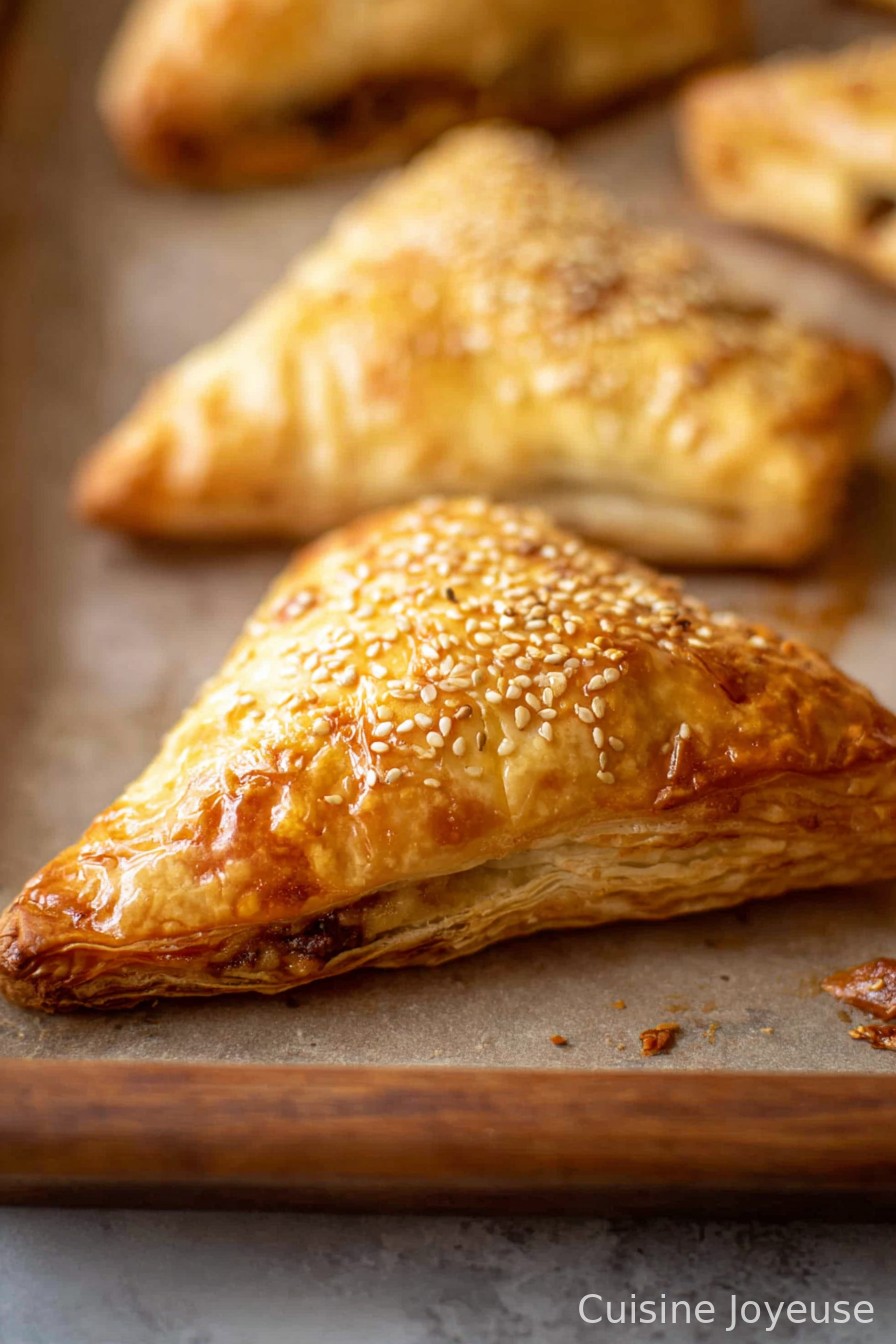
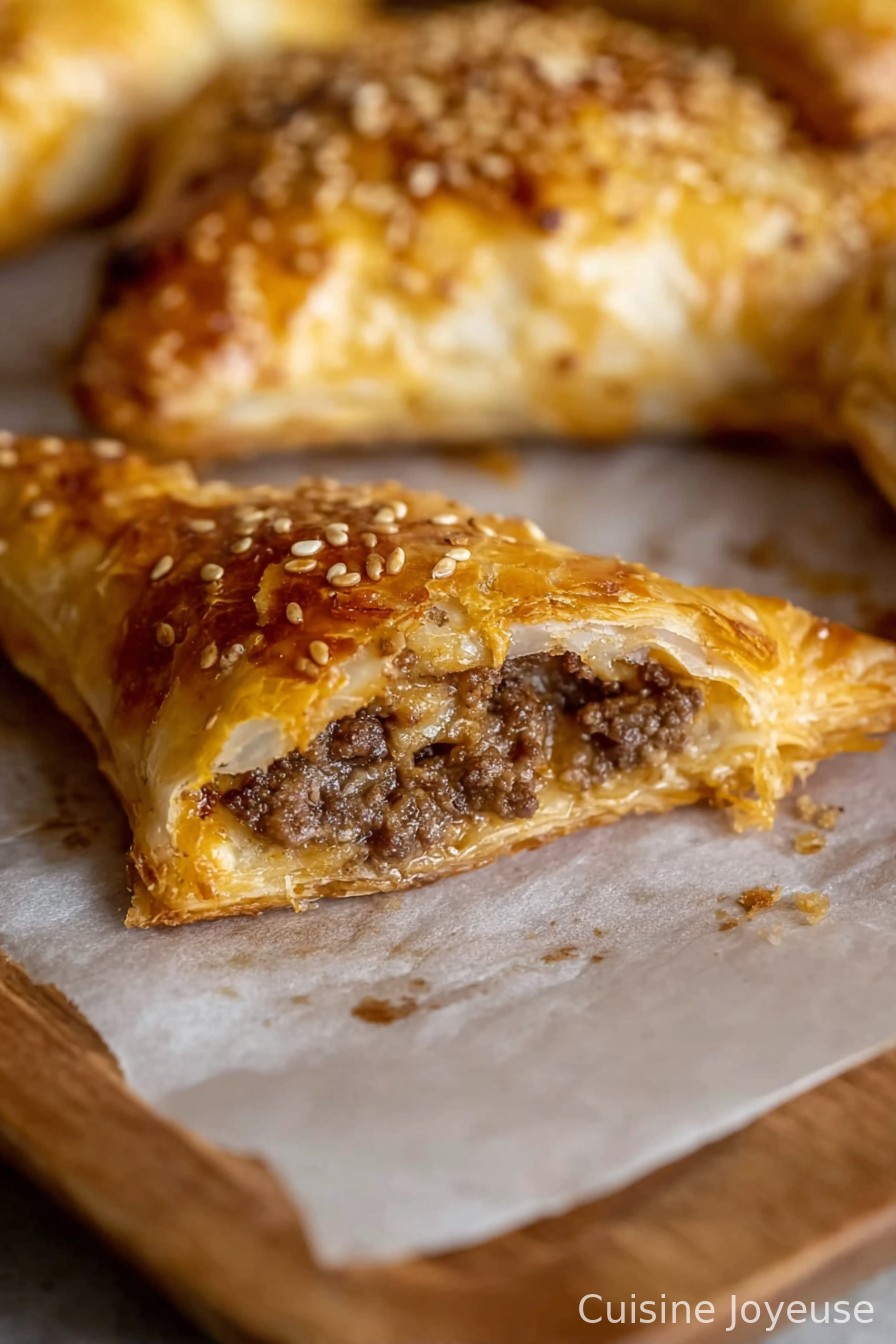
Cheeseburger Puff Pastry Pockets
If You’re Looking for a Cheat Code Dinner…
I kind of stumbled on Cheeseburger Puff Pastry Pockets by accident, if I’m being honest. We were all starving after a long day at the park (mud, lost trainers, the usual), and I had defrosted some puff pastry with zero plan. I’m not fancy, just hungry. So I mixed up what you’d find in a cheeseburger and tucked it all snug in pastry squares—and now the kids ask for them more than they do real burgers. Even my brother-in-law had to admit they’re moreish, though he still thinks ketchup should be its own food group. Anyway, these little guys are like cheeseburgers dressed up for a tea party. Bet you’ll love ’em too. Oh, and once I tried using leftover roasted veg in there; let’s just say don’t do that if you’re hoping for the classic taste!
Why These Make Me Look Like a Genius (Sometimes)
I make this recipe when everyone shouts “What’s for dinner!?” and I’ve only got half an hour to make something that won’t get side-eyed. My family goes mad for these, and they’re perfect for sneaky veggie additions (mushrooms, anyone?). Sometimes I get a bit grumpy rolling out the pastry because it sticks, but if you flour the counter generously…problem mostly solved. Plus, you can dip ’em or eat right out of hand. One less fork to wash!
The Stuff You’ll Need (But Honestly, Improvise a Bit)
- 2 sheets frozen puff pastry, thawed (or 1 big one cut in half—I’ve grabbed the off-brand, it’s fine)
- 250g (about 1/2 lb) ground beef (sometimes I use ground turkey or chopped mushrooms if I’m feeling virtuous)
- 1 small onion, diced (optional—my youngest swears onions are “spicy”)
- 1 pickle, finely chopped (you can skip if pickles make you shudder; sometimes I use sweet relish)
- 1/2 cup shredded cheddar cheese (swap with mozzarella or whatever cheese you’ve got lurking in the fridge)
- 2 tablespoons ketchup (my uncle adds a spoon of BBQ sauce instead; wild times)
- 1 tablespoon yellow mustard (optional, or use Dijon if that’s your jam)
- 1 egg, beaten (for brushing the top, but I’ve forgotten this step plenty of times—it still works okay)
- Salt and pepper, a few pinches should do
- Optional: Sesame seeds for topping (they’re pretty, not essential)
Here’s How I Throw Them Together
- Pop the oven on at 200°C (about 400°F). Line a baking sheet with parchment, unless you love scrubbing burnt cheese bits.
- Brown the ground beef in a skillet over medium heat with a splash of oil (or none, if your beef is fatty). I toss the diced onion in, too—unless a picky eater is circling. Drain the extra grease if it looks like a puddle.
- Stir in ketchup, mustard, chopped pickles (if using), and a little salt and pepper. Let it cool just a bit; otherwise, the cheese melts too soon and it goes weird. This is where I usually sneak a taste—quality control, right?
- Unroll the puff pastry on a floured counter. Cut it into roughly 4-6 squares per sheet (depends how hungry people are, honestly).
- Spoon a good heap (maybe 2 tbsp?) of the meat mix onto the center of each square. Top with a generous pinch of cheese. Not a science—just don’t over-fill or they’ll pop open (ask me how I know).
- Fold each square over to form a triangle or rectangle, pressing the edges with a fork to seal. If some filling escapes, it’s not a crisis. Brush the tops with beaten egg (or don’t—I’ve made both, it’s fine). Sprinkle sesame seeds on top for a “burger bun” effect if feeling posh.
- Bake 18–22 minutes, until they’re golden brown and puffed up. If they leak, that’s flavor for the baking paper. Let ’em cool a few mins, then eat while the cheese is still stretchyyyy.
Notes From My Many Attempts
- If you overfill, they WILL burst. It’s not the end of the world—it just gets a bit messy. Still edible.
- Actually, I find it works better if you let the filling cool before adding to the pastry. Hot filling = gluey dough.
- I once tried brushing with milk instead of egg (ran out). Not quite as golden, but works in a pinch.
Some Variations I’ve Tried (Or Regretted)
- Added chopped cooked bacon once—tasted like a bacon cheeseburger in a coat!
- Tried with pizza sauce and mozzarella—honestly, sort of odd, but the kids called them “cheeseburger pizzas” so maybe not a total flop.
- Swapped the meat entirely for black beans with taco spices. It was…well, I liked it, but my dad missed the beef!
- One experiment with blue cheese didn’t go over well. Not repeating that any time soon.
What If I Don’t Have Special Tools?
You really just need an oven and a tray. If you don’t have a rolling pin, a wine bottle (empty or full—no judgment) works just fine for flattening out pastry. And a fork for sealing—don’t sweat if you don’t have one, just pinch with your fingers.
Can These Be Stored?
Yep—cool them down and pop in an airtight box in the fridge. They’ll last about 2 days, though honestly, in my house it never makes it past breakfast the next day. I even like them cold. If you want to reheat, I’d say blast them in a hot oven for a few minutes to keep them crisp. Microwave kinda ruins the magic, if I’m truthful.
How Do I Like to Serve ‘Em?
I usually plop ’em down with a silly pile of crinkle fries and a side of ketchup, maybe some carrot sticks if I’m pretending it’s a balanced meal. Sometimes we wrap them in napkins and eat on the sofa—movie night winner. Big dollop of mustard for me. Oh, and my friend dips hers in ranch; not my thing, but go wild.
Bit of Wisdom (Well, Sorta)
- This is not the time to skip chilling the pastry. I rushed once—end result, soggy bottoms. Not my proudest moment.
- Seal the edges tightly or you’ll have a mess. Learned that real quick on my first try, which was—shall we say—rustic?
- Let ’em cool a few minutes. Hot cheese is like napalm if you bite in too soon!
Questions Folks Have Actually Asked Me
- Can I make these ahead of time?
- Yeah! Sometimes I prep them in the morning, stash ’em in the fridge, and bake at the last minute. Actually, I think they taste better the next day (odd, but true).
- What if I forgot to thaw my pastry?
- Well, join the club! Sit it on the counter for like 20 mins, then try gently prying it apart. Don’t microwave it or it gets weirdly sweaty.
- Can you freeze Cheeseburger Puff Pastry Pockets?
- Sure thing. I freeze unbaked pockets, then bake from frozen (just add 7-8 minutes to the oven time). Sometimes they brown a tad unevenly, but who’s judging?
- Seriously, pickles?
- Pickles are the soul of a cheeseburger pocket. That said, skip ’em if they give you the heebie-jeebies.
And here’s a random one—my old neighbor once tried these with crushed potato crisps inside for crunch. Not my style, but I’ll admit curiosity got the better of me more than once. Food’s meant to be fun, anyway!
Ingredients
- 1 sheet of puff pastry, thawed
- 250g (1/2 lb) ground beef
- 1/2 small onion, finely chopped
- 1/2 cup shredded cheddar cheese
- 1 tablespoon ketchup
- 1 tablespoon yellow mustard
- 1 teaspoon garlic powder
- Salt and black pepper, to taste
- 1 egg, beaten (for egg wash)
- 2 tablespoons pickle slices, chopped (optional)
Instructions
-
1Preheat oven to 400°F (200°C) and line a baking sheet with parchment paper.
-
2In a skillet over medium heat, cook the ground beef and chopped onion until the beef is browned and onion is soft. Drain excess fat.
-
3Stir in ketchup, mustard, garlic powder, salt, pepper, and optional chopped pickles. Remove from heat and let cool slightly.
-
4Roll out the puff pastry sheet and cut into 4 equal squares. Place a spoonful of beef mixture and some cheddar cheese in the center of each square.
-
5Fold each pastry over to form a triangle or rectangle, sealing the edges with a fork. Brush tops with beaten egg.
-
6Place on the prepared baking sheet and bake for 20-25 minutes, or until puffed and golden. Serve warm.
Approximate Information for One Serving
Nutrition Disclaimers
Number of total servings shown is approximate. Actual number of servings will depend on your preferred portion sizes.
Nutritional values shown are general guidelines and reflect information for 1 serving using the ingredients listed, not including any optional ingredients. Actual macros may vary slightly depending on specific brands and types of ingredients used.
To determine the weight of one serving, prepare the recipe as instructed. Weigh the finished recipe, then divide the weight of the finished recipe (not including the weight of the container the food is in) by the desired number of servings. Result will be the weight of one serving.
Did you make this recipe?
Please consider Pinning it!!