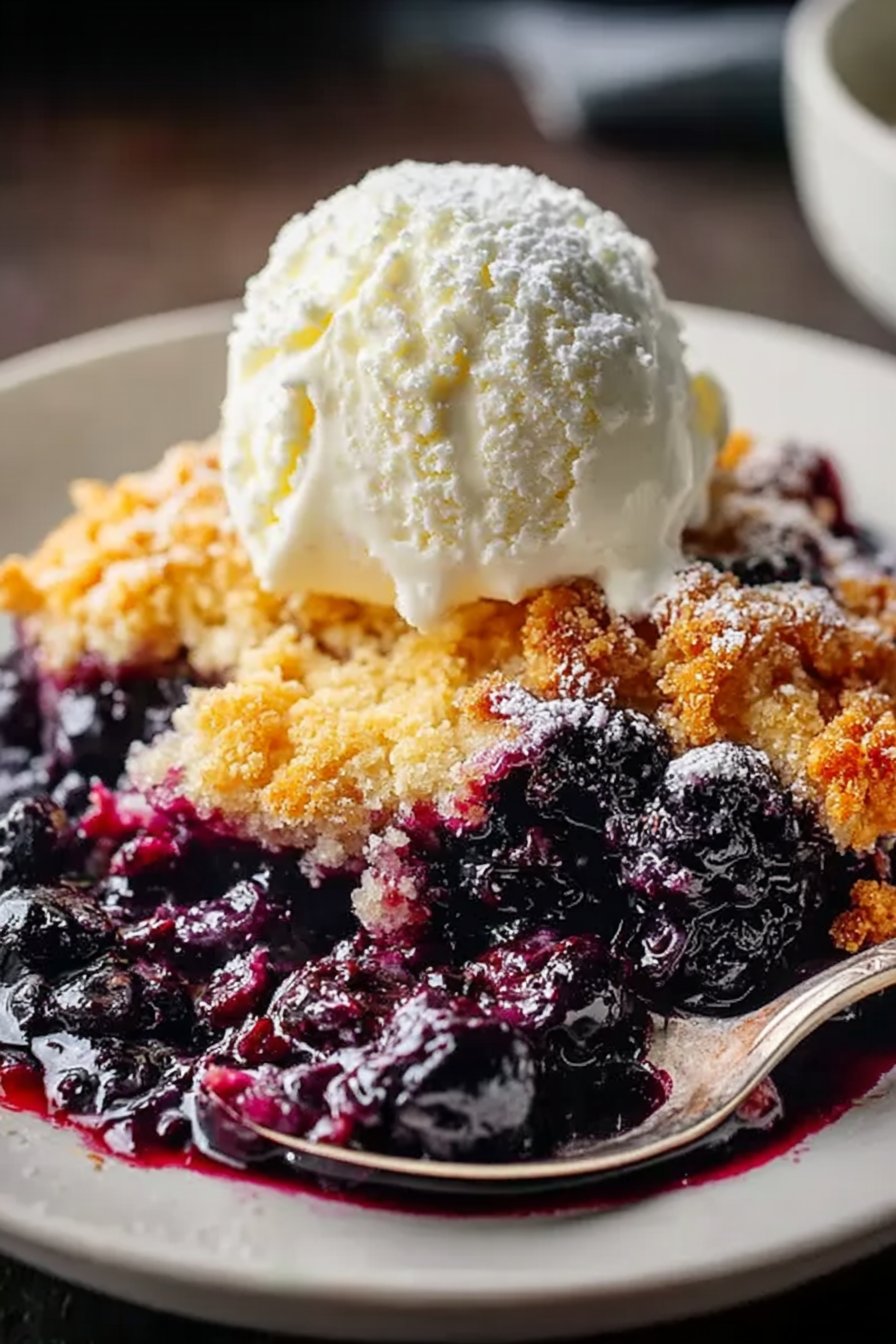
Blueberry Cobbler
Alright, y’all, gather ’round! There are some recipes that just *scream* comfort, aren’t there? For me, it’s definately this blueberry cobbler. I swear, the smell of it baking transports me right back to my grandma’s kitchen on a humid summer afternoon. She’d always have a pan of something bubbly in the oven, usually with berries she’d picked herself. And while I might not be out foraging for my own blueberries (shout out to the grocery store freezer aisle, am I right?), the feeling this cobbler gives me is pure, unadulterated nostalgia. It’s the kind of dessert that makes you want to curl up on the couch with a good book, or share a big ol’ spoonful with a friend after a long day. Honestly, it’s just sunshine in a dish, trust me.
Why You’ll Love Making This (and Eating It!)
So, why is this *the* blueberry cobbler recipe for me? Well, for starters, it’s a cinch. I make this when I’m craving something homemade but don’t have the energy for, say, a pie crust that requires rolling and chilling and all that fuss. My family goes absolutely wild for this because it hits all the right notes: sweet, tart, a little bit jammy, and that beautiful, tender biscuit topping. (Confession: I used to really struggle with getting the topping right, it was either too dry or too runny. But I’ve nailed it, and I’ll share my secret!) Plus, it’s just so forgiving. Got slightly bruised berries? No problem. Wanna skip the cinnamon? Go for it! This recipe just works.
What You’ll Need (the Ingredients!)
This list is pretty basic, which is another reason I love it. You probably have most of this stuff in your pantry already.
- For the Berry Filling:
- 6 cups fresh or frozen blueberries (if using frozen, don’t thaw ’em! I sometimes use a mix of blueberries and a handful of raspberries when I’m feeling fancy, and it’s great!)
- 1/2 cup granulated sugar (or a bit more if your berries are super tart)
- 2 tablespoons cornstarch (this helps thicken everything up, you don’t want a watery mess!)
- 1 tablespoon lemon juice (freshly squeezed, please! It really brightens the flavor)
- 1 teaspoon vanilla extract (the good stuff, not the imitation kind. I swear by a specific brand I found online, it’s worth it.)
- Pinch of salt
- Optional: 1/4 teaspoon ground cinnamon (I usually add this, but sometimes I forget and it’s still delicious)
- For the Topping:
- 1 1/2 cups all-purpose flour (my grandmother always insisted on King Arthur, but honestly any good quality flour works fine)
- 1/2 cup granulated sugar
- 1 tablespoon baking powder (make sure it’s fresh!)
- 1/2 teaspoon salt
- 6 tablespoons unsalted butter, very cold and cut into small cubes (this is key for a tender topping)
- 1/2 cup milk (whole milk is best, but 2% is fine too)
- Optional: 1 tablespoon coarse sugar for sprinkling on top (makes it pretty and adds a nice crunch!)
Let’s Get Cooking: The Directions
Okay, here’s how we make this magic happen. Don’t overthink it, really.
- Get that Oven Hot: Preheat your oven to 375°F (190°C). Grab a 9×13 inch baking dish, or a similar sized oven-safe dish, and set it aside. I mean, you don’t need to grease it or anything.
- Berry Bliss Time: In a large bowl, gently toss together the blueberries, sugar, cornstarch, lemon juice, vanilla extract, and that tiny pinch of salt (and cinnamon, if you’re using it). Pour this mixture into your prepared baking dish. Spread it out evenly. This is where I usually sneak a taste of a raw berry, you know, just for quality control.
- Topping Tactics: In a separate, medium-sized bowl, whisk together the flour, sugar, baking powder, and salt for the topping. Now, add your cold butter cubes. This next part is kinda fun: using your fingertips or a pastry blender (I use my fingers, it’s more satisfying), cut the butter into the dry ingredients until it resembles coarse crumbs. Some bigger pieces of butter are totally fine, actually, I find it works better if there are a few pea-sized bits left.
- Add the Wet to the Dry: Pour the milk into the flour-butter mixture. Stir just until everything is combined. Seriously, don’t overmix! A few lumps are okay; overmixing will make your topping tough. You’re aiming for a soft, shaggy dough.
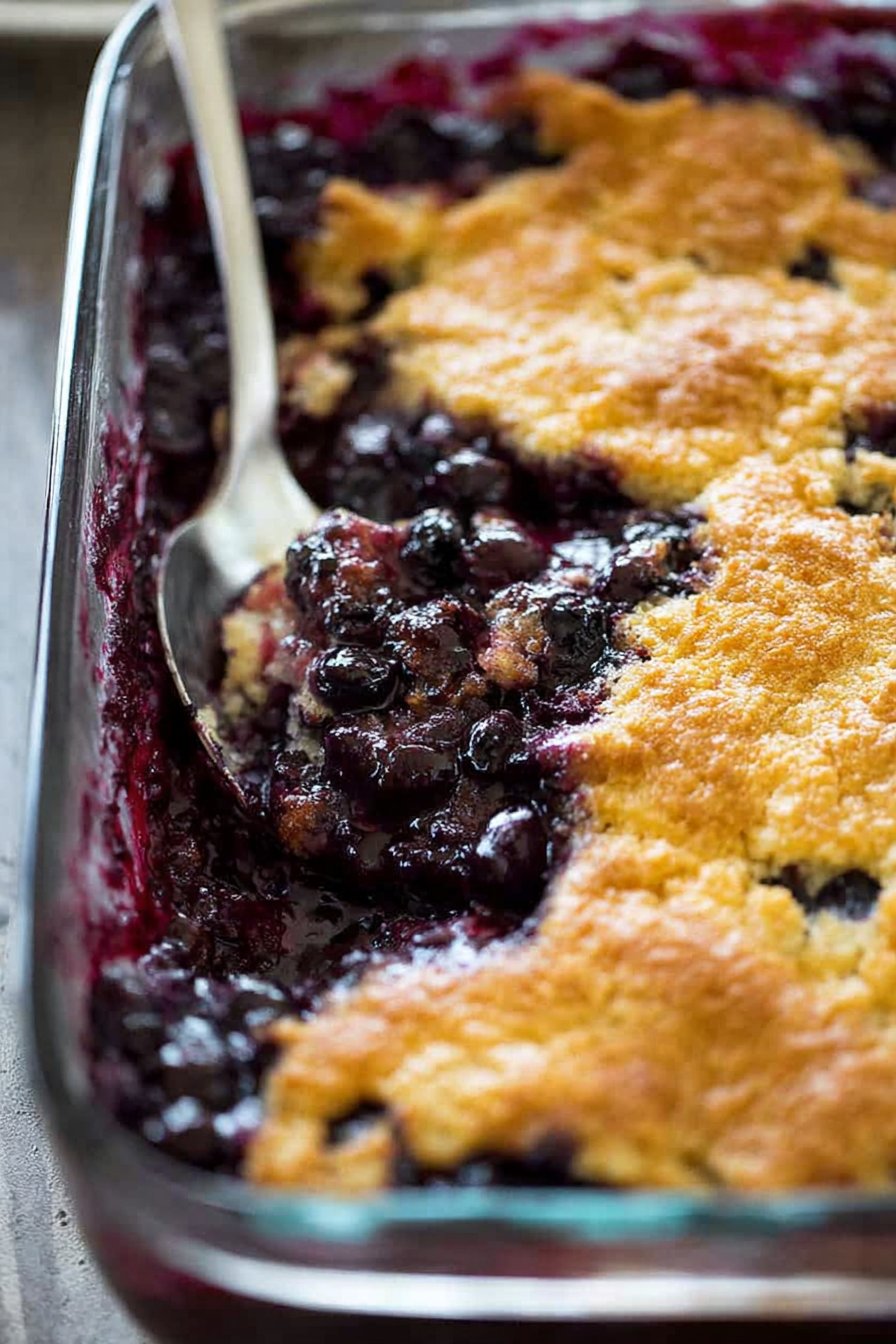
- Top it Off: Spoon dollops of the topping mixture evenly over the berry filling. It doesn’t have to be perfect; a rustic look is part of the charm! If you’re using coarse sugar, sprinkle it generously over the topping now.
- Bake It Till Bubbly: Pop that dish into your preheated oven. Bake for 40-50 minutes, or until the topping is golden brown and the berry filling is bubbly around the edges. Don’t worry if it looks a bit weird at this stage – it always does! The exact timing can depend on your oven, so just keep an eye on it.
- Cool Down (if you can!): Let the cobbler cool for at least 15-20 minutes before serving. This lets the filling set up a bit, otherwise it’ll be super runny. Though honestly, it’s hard to wait when it smells this good.
Little Notes I’ve Learned
Through countless batches (and a few oopsies!), I’ve picked up some things:
- Berry Quality Matters: Super ripe, sweet blueberries make a huge difference. If your berries aren’t super flavorful, a little extra lemon juice or sugar can rescue the dish.
- Don’t Overmix the Topping: This is probably the most crucial tip. Overmixing develops the gluten in the flour, making the topping tough instead of tender and fluffy. Just mix until barely combined.
- Oven Variations: Every oven is a little different. Mine sometimes needs 45 minutes; my old apartment oven needed a full 50. Keep an eye on the browning and the bubbling.
- Cold Butter, Always: Warm butter melts into the flour too quickly and you won’t get that lovely crumbly texture. Stick with cold butter for the topping, it’s its own little secret weapon.
Experiments (Some Good, Some… Less So)
I’m always messing around with recipes, and this blueberry cobbler is no exception. For variations:
- Mixed Berry Cobbler: I’ve done this with strawberries, blackberries, and raspberries mixed in with the blueberries. It’s absolutely divine, especially if you love a bit more tartness. Just make sure the total berry amount stays around 6 cups.
- Oatmeal Topping: Sometimes I’ll swap out about a 1/4 cup of the flour in the topping for rolled oats and add a pinch of nutmeg. It gives it a lovely, chewy texture and a cozy, homey flavor.
- Lemon Zest in Topping: A little lemon zest (about a teaspoon) grated into the topping dough adds an amazing brightness that complements the blueberries so well.
- The Pecan Disaster: Okay, so one time I thought, “Hey, what about a savory cobbler topping with pecans and cheddar?” Sounds kinda good on paper, right? With blueberries? Not so much. It was… memorable, but for all the wrong reasons. Stick to sweet, people.
What You’ll Need (the Equipment!)
You really don’t need much fancy stuff for this.
- A large mixing bowl for the berries
- A medium mixing bowl for the topping
- A 9×13 inch baking dish (I love my cast iron one for this, it heats so evenly, but honestly, any ceramic or glass dish works just fine, promise. These are pretty good if you’re looking for one.)
- Measuring cups and spoons
- A pastry blender or just your clean hands (my preferred method, obviously)
- A spatula or spoon for mixing
Storing Your Cobbler (Good Luck!)
If by some miracle you have leftovers (and that’s a big *if*), you can cover the cobbler tightly with plastic wrap or foil and store it at room temperature for a day or two. If it’s going to be longer, pop it in the fridge for up to 4-5 days. You can gently reheat individual servings in the microwave or a low oven. Though honestly, in my house it never lasts more than a day! Seriously, what are leftovers?
How I Like to Serve It
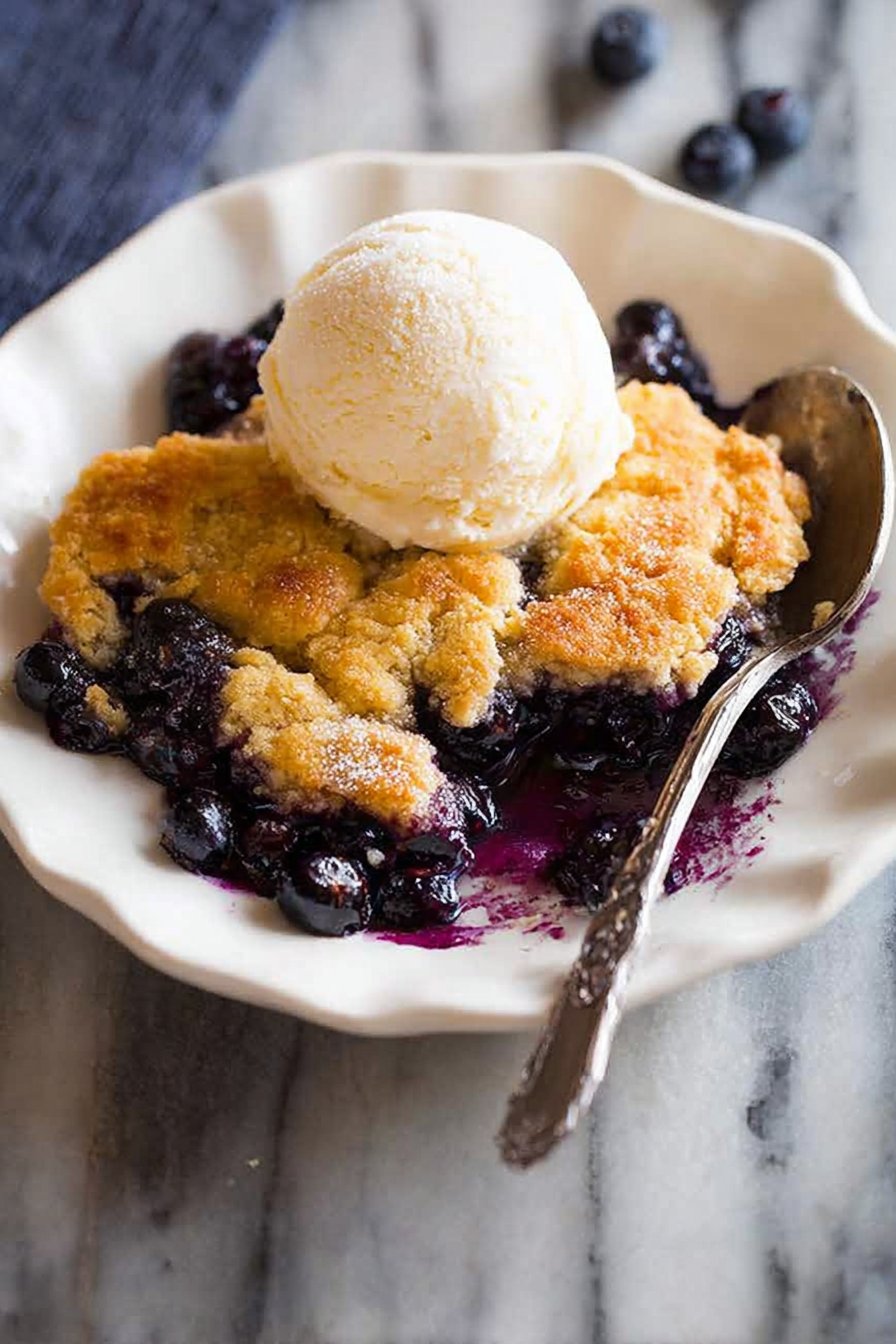
- Classic with Vanilla Ice Cream: This is non-negotiable for me. A warm scoop of cobbler with a melting dollop of good vanilla bean ice cream is peak comfort. It’s just perfection.
- A Swirl of Whipped Cream: If you’re out of ice cream, a generous swirl of freshly whipped cream is a close second. Maybe a dusting of cinnamon.
- Just Plain: Honestly, sometimes I just eat it straight out of the dish with a spoon. No judgment here. It’s fantastic on its own too.
- For Breakfast: Don’t tell anyone, but a cold piece the next morning with a cup of coffee is an absolute dream. My family would probably disown me if they knew, but hey, it’s my treat.
My “Lessons Learned” (Pro Tips!)
- Don’t Be Shy with the Cornstarch: I once tried skimping on the cornstarch, thinking “eh, it’ll be fine,” and regretted it because my cobbler was soupier than a fresh pot of gumbo. Two tablespoons is key for that perfectly jammy, not runny, filling.
- Let It Cool: I know, I know, it’s torture. But letting it cool for at least 15-20 minutes really does help the filling set. If you dig in too soon, it’ll just spill everywhere. Be patient, it pays off.
- Use Ripe Berries: This one seems obvious, but unripe blueberries just won’t give you that burst of flavor you want. If yours are a little lackluster, a tiny bit more sugar and an extra squeeze of lemon can help wake them up.
FAQs (Because Someone Always Asks!)
- “Can I use frozen blueberries?” Yes, absolutely! That’s what I use half the time. Don’t thaw them first – just toss ’em in frozen. They’ll release their juices as they bake, and the cornstarch handles it.
- “My cobbler is too watery, help!” Ugh, that’s the worst! It usually means you needed a little more cornstarch, or your berries were super juicy. Next time, try adding an extra half tablespoon of cornstarch. Or, maybe your oven wasn’t quite hot enough, preventing the filling from thickening properly.
- “Can I make this ahead of time?” You can assemble the berry filling and even the dry topping mixture a few hours ahead, but I wouldn’t combine them until you’re ready to bake. The topping will get soggy if it sits on the wet berries for too long. Best baked fresh!
- “Is this more like a crisp or a crumble?” Oh, good question! It’s definately a cobbler because of that biscuit-like topping. Crisps usually have oats in their topping, and crumbles tend to be streuselly. This one’s got that soft, cakey-biscuit thing going on. Yum!