Apple Cobbler Recipe
Let Me Tell You About This Apple Cobbler Recipe…
You ever crave something warm and homey and not too fancy—just really good? I swear, this apple cobbler fits the bill every time. The first time I baked it, my kitchen smelled like a fall festival and I even caught my brother sneaking spoonfuls straight from the dish (not judging—I’ve done the same). Honestly, it reminds me of rainy weekends, homemade vanilla ice cream, and trying (and failing) to not eat dessert before dinner. Oh, and if you’re anything like me, there’ll be flour on your shirt and probably in your hair too. Honestly, that’s half the fun.
Why You’ll Love This Apple Cobbler
I make this when I have apples piling up and, let’s be real, not much patience for fancy baking (pie crust is my nemesis). My family hovers around the oven while it’s baking because, apparently, watching cobbler bubble is some sort of sport in my house. If you hate prepping apples, trust me—I’ve timed myself at this point and you can totally cut corners (just don’t tell my mom). I love that it’s not fussy about what variety you use; I’ve mixed honeycrisps with whatever-else-is-on-hand, and no one noticed. Bonus: you barely need to measure. Not kidding. If you eyeball the cinnamon, I’m not calling the recipe police.
What You’ll Need (Substitutions Galore)
- About 6 cups sliced apples (Granny Smith are classic, but I’ve tossed in Pink Lady, too — when they’re on sale, that’s what I grab)
- 3/4 cup sugar (white, or swap in brown for a deeper flavor—my aunt swears by turbinado, but meh, use what you like)
- 1 tbsp lemon juice (or a splash of apple cider vinegar in a pinch—seriously)
- 1 tsp cinnamon (OK, I just shake it in until it smells right; call it a teaspoon plus a smidge)
- 1/4 tsp nutmeg (skippable—if you don’t have it, don’t panic)
- For the topping: 1 cup all-purpose flour (grandma insisted on Gold Medal, but honestly, store brand is fine)
- 1/2 cup sugar (brown or white, you do you)
- 1/2 tsp baking powder
- 1/4 tsp salt
- 1 stick (1/2 cup) cold butter, cubed (I use salted butter, but unsalted if you like to feel fancy)
- 1/4 cup boiling water (I cheat and microwave it for 30 seconds)
Here’s How I Make It (Give or Take)
- Preheat your oven to 375°F (or 190°C if your oven’s European—been there). Grease a medium baking dish (about 8×8 inches). I’ve gone with glass and ceramic, never noticed a big difference.
- Toss your sliced apples in a big bowl with 3/4 cup sugar, lemon juice, cinnamon, and nutmeg. Stir it all up (this is where I sneak a piece, for quality control, obviously).
- Dump the apple mixture into the greased dish. Spread it all out, but the layer doesn’t need to be perfectly even. It’ll settle.
- Now for the topping: In another bowl, mix flour, 1/2 cup sugar, baking powder, and salt. Add butter cubes, and use your fingers or a pastry cutter (or, honestly, two forks in a criss-cross dance) to rub it in. You want it crumbly—like loose wet sand? Maybe not that wet… but you get me.
- Pour in the boiling water. Stir gently until it just holds together (don’t overmix, or it gets tough, and learn from my mistake—overzealous stirring is a recipe’s frenemy).
- Dollop the dough over the apples. Don’t stress if there are gaps. Magic happens in the oven.
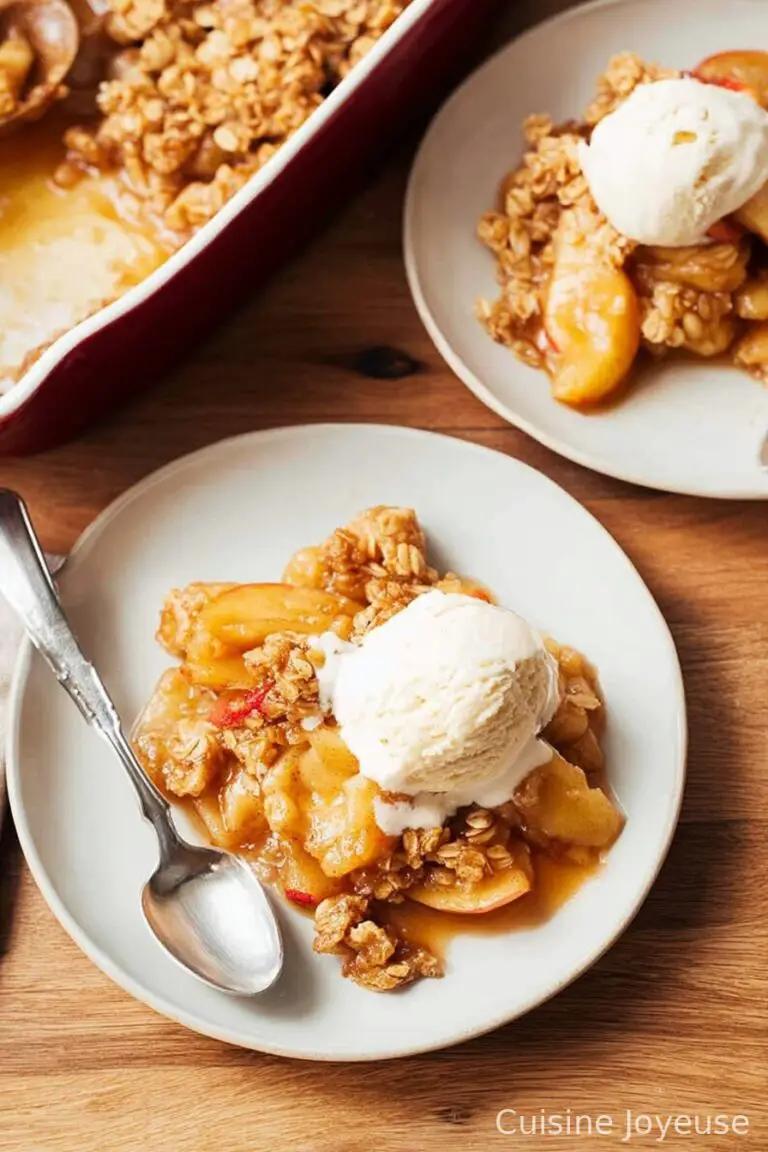
- Bake 40 minutes. The top should be golden, and there’ll be happy bubbling around the crust. If your apples are extra juicy, maybe go to 45 minutes. You’ll know it’s done when your house smells amazing and you can’t wait any longer.
Some Hard-Earned Notes
- If you use tart apples, you may want a smidge more sugar—or pour a little maple syrup over the apples, which I accidentally did once and, wow, new favorite.
- A little bit of extra cinnamon never hurt anyone. Or maybe it did, but not in my kitchen.
- If your butter is too soft, stick it back in the fridge. Warm butter just makes goop instead of crumbles—I learned that the hard way when my kitchen was, well, like a sauna in July.
Variations To Shake Things Up
- I once tried tossing in a handful of cranberries — gave it a zippy vibe! Blueberries work OK, too, but honestly, the flavor got a bit muddled.
- Gluten-free flour blend works surprisingly well, though the topping is a bit more crumbly (not a bad thing, if you ask me).
- Pear slices instead of apples? Tried it, sort of weird but worth a shot if that’s what you’ve got. I’d stick with at least half apples next time though.
The Gear You Might Use (But Don’t Stress It)
Look, if you have a pastry cutter, great. If not, forks work, your hands work (just work quick so you don’t melt the butter). An 8×8 dish is traditional, but last week I used a pie pan… and guess what? Still delicious. If you don’t have a wire rack to cool it, a folded-up dish towel works. Just don’t touch the pan. Ow.
Storing Leftovers? (If That Happens)
This is honestly a trick question because in my house, the cobbler is usually gone before it’s even cool enough to cover. But if you do save some, cover it and stick it in the fridge for up to 3 days. I think it tastes even better the next day, but who’s counting? You can gently rewarm in the oven or, honestly, eat it cold — the topping softens, but the flavor is still top-notch.
How I Like To Serve It
Scoop it into bowls and top with a big spoonful of vanilla ice cream—bonus points if it starts melting and swooshing into the warm apples. My cousin likes whipped cream; my dad sometimes adds sharp cheddar cheese. I thought that was bonkers but, mate, it’s actually good. Tradition-wise, we once tried it with morning coffee for breakfast. I’m not saying it should replace toast, but… try it.
Pro Tips (a.k.a. Mistakes I’ve Made So You Don’t Have To)
- Let it cool at least 15 minutes before serving! I once tried to dish it up too soon and wound up with apple lava on my plate and, worse, my tongue.
- If the topping looks too pale, just pop it back in for a few minutes. It catches up fast; don’t walk away to fold laundry or you’ll forget and then—burnt crust disaster. Happened once, smelled like regret.
What People (and I) Always Ask Me
- Can I use canned apples?
- Absolutely, in a pinch. Drain them a bit though—canned fills with extra syrup. It’s not quite the same as fresh but totally works on lazy days.
- Is this the same as apple crisp?
- Nope—it’s more cakey. The topping’s thicker, almost like a biscuit. Actually, apple crisp uses oats, and this doesn’t. Here’s a pretty handy rundown on the difference from The Kitchn. (Worth a read if you’re a dessert nerd like me.)
- Can I double the recipe?
- For sure, though you’ll want a bigger dish (like a lasagna pan) and maybe add 10 mins to the bake time. I learned this the fun way when half the neighborhood showed up.
- What’s the best apple for cobbler?
- I go for a mix: Granny Smith for tart, plus whatever’s sweet from the farmer’s market. But if all you have is one type, don’t you worry. It’ll still be cobbler!
- Where’d you learn cobbler, anyway?
- Mostly form my grandma, a bit from YouTube tutorials. Found Sally’s Baking Addiction great for troubleshooting topping concerns, so if you’re stuck, check it out!
Most important thing? Just give it a go. And if things get a bit messy, at least there’s dessert at the end. Happy baking, mate!
Ingredients
- 6 cups peeled and sliced apples (about 5-6 medium apples)
- 2/3 cup granulated sugar
- 2 tablespoons all-purpose flour
- 1 teaspoon ground cinnamon
- 1/4 teaspoon ground nutmeg
- 1 tablespoon lemon juice
- 1 cup all-purpose flour
- 1/4 cup granulated sugar
- 1 1/2 teaspoons baking powder
- 1/4 teaspoon salt
- 1/2 cup unsalted butter (cold, cut into cubes)
- 1/3 cup milk
Instructions
-
1Preheat the oven to 375°F (190°C). Grease a 2-quart baking dish.
-
2In a large bowl, toss the sliced apples with 2/3 cup sugar, 2 tablespoons flour, cinnamon, nutmeg, and lemon juice. Spread the apple mixture evenly in the prepared baking dish.
-
3In a separate bowl, combine 1 cup flour, 1/4 cup sugar, baking powder, and salt. Cut in the butter using a pastry blender or fork until the mixture resembles coarse crumbs.
-
4Add the milk to the flour mixture and stir just until combined. Drop spoonfuls of the dough over the apple mixture in the baking dish.
-
5Bake for 40 minutes, or until the topping is golden brown and the apples are bubbling. Allow to cool slightly before serving.
Approximate Information for One Serving
Nutrition Disclaimers
Number of total servings shown is approximate. Actual number of servings will depend on your preferred portion sizes.
Nutritional values shown are general guidelines and reflect information for 1 serving using the ingredients listed, not including any optional ingredients. Actual macros may vary slightly depending on specific brands and types of ingredients used.
To determine the weight of one serving, prepare the recipe as instructed. Weigh the finished recipe, then divide the weight of the finished recipe (not including the weight of the container the food is in) by the desired number of servings. Result will be the weight of one serving.
Did you make this recipe?
Please consider Pinning it!!