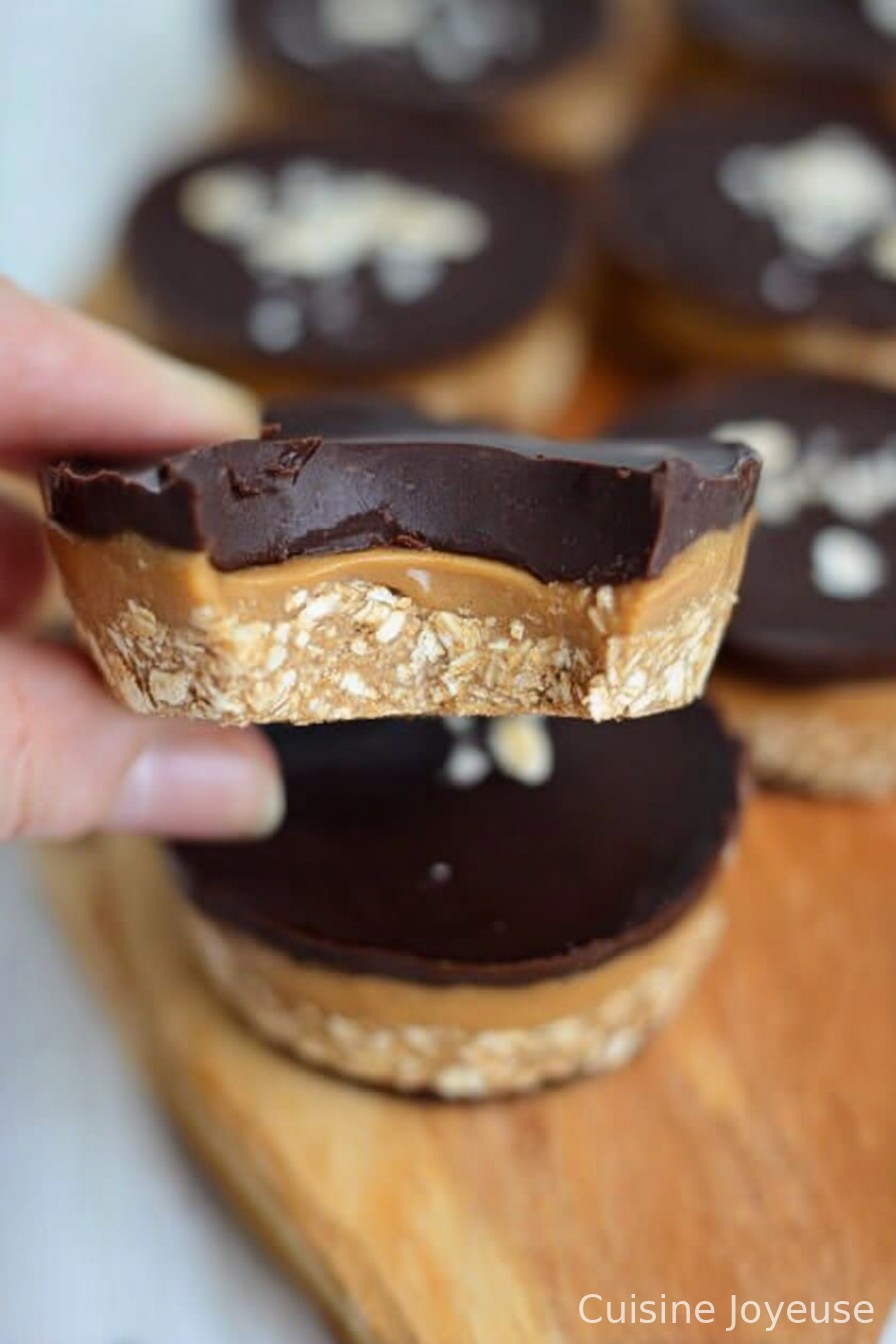
No Bake Peanut Butter Oat Cups
Let Me Tell You About My Favorite Snack (And Total Lazy-Day Savior)
You ever just crave something sweet, salty, kinda hearty, but, let’s be real, you absolutely cannot be bothered to preheat the oven? Yep, happens to me all the time. That’s kind of how my love affair with these No Bake Peanut Butter Oat Cups started. First time I made these, my little niece ‘helped’ (really just licked the spoon and somehow ended up with peanut butter in her hair) — so, fair warning, it can get a tad chaotic but I promise it’s totally worth it. I still discover oat flakes in the oddest places (why do oats stick to elbows?).
Why I Keep Making These Over and Over
I make these whenever I need something for lunchboxes, snacks between Zoom meetings, or that sneaky midnight treat. The whole family goes bonkers for this — my partner claims it’s the only “healthy” thing they actually look forward to (questionable, but I’ll take it). What I also love is there’s zero oven involvement (the last time I burnt, well, anything, I swore off using it unless there’s company). These oat cups save me from myself! And, okay, they’re super forgiving — unlike soufflé — because you really can’t mess them up. Wait, actually, maybe once I did… but I’ll save that story for the variations section.
Stuff You’ll Need (But Don’t Stress About Brands or Substitutes)
- 1 1/2 cups old-fashioned oats (sometimes I use quick oats; seriously, both work. My grandmother always insisted on Bob’s Red Mill, but you can raid whatever’s in the cupboard)
- 1/2 cup natural peanut butter (or any nut/seed butter — almond, sunflower, even tahini, though that one was a wild ride)
- 1/4 cup honey or maple syrup (maple if I’m feeling all earthy; honey if I’m out or my neighbor’s bee-keeping hobby pays off)
- 1/4 cup coconut oil, melted (you can swap butter, but coconut oil keeps things dairy-free — most of the time I just use whatever’s not rock solid from the fridge)
- A handful of mini chocolate chips (optional – totally unnecessary but recommended, especially if you have no willpower, like me)
- Pinch of sea salt (unless your peanut butter’s already salty — you do you!)
- 1/2 tsp vanilla extract (I skip this if I can’t reach the bottle… it’s fine)
How I Throw These Together (with Room to Wing It)
- Line a muffin tin with muffin liners. Look, I’ve totally just greased the pan before, but getting them out is fiddly so liners = less cursing.
- In a mixing bowl, toss in oats, a pinch of salt, and chocolate chips if you’re using (I always sneak a few into my mouth, you feel me?).
- In a small saucepan (or just the microwave if you’re feeling rebellious), melt the coconut oil and peanut butter together. Dump in the honey (or maple) and vanilla, give it a good stir. It’ll look a bit glossy and thick — this is where I have to keep myself from eating it straight, honestly.
- Pour the wet stuff over the oat mix. Give it a stir until the oats are pretty evenly coated. If it seems too dry, add a tiny splash of coconut oil (or maple, if you want sweeter). Don’t panic if it looks weird at this stage; after a good mix, it’ll come together.
- Scoop the mixture into the muffin liners. I use a big spoon; you could use an ice cream scoop — whatever gets it done. Press down with the back of the spoon just enough to smoosh it into the cup shape.
- Pop the tray into the fridge for at least an hour. Or honestly, as long as you can stand it. (I once pulled one out after 20 mins — still tasty, just a bit crumbly.)
- Peel away the liner and eat! Or store in an airtight container for when you need that quick snack fix.
Notes: Things I’ve Learned (Often the Hard Way)
- If your peanut butter’s super runny, add a tablespoon more oats. If it’s stubborn and thick, sneak in a drizzle of coconut oil.
- Let these sit out for a minute before peeling off the wrapper; otherwise, it sometimes takes a chunk of the cup with it, which is…annoying.
- On hot days, these get soft pretty fast. Not the end of the world — just eat them quicker! (The hardship.)
Some Variations That Actually Worked (and One That Bombed)
- Swapped in almond butter — came out smoother and lighter, which my friend calls “bougie energy bites.”
- Added chopped dried cranberries and chopped sunflower seeds — yum, got that chewy bite.
- Tried tahini and molasses once, thinking I’d do a “grown-up” version. It tasted like…well, let’s not repeat that experiment.
Tools? Don’t Fret If You’re Missing One
A muffin tin makes these look all neat, but I’ve also used silicone cupcake molds, or just free-formed them on a parchment-lined tray — some were circles, some more ‘modern art.’ No one complained. And if you can’t find your mixing bowl, a big salad bowl totally works (don’t ask).

How To Store (If They Ever Last That Long)
Supposedly, these keep in an airtight container in the fridge for up to a week. But — I’m not kidding — they’re usually gone by day two, max. You can freeze them too, actually; I just rarely get the chance. A friend of mine likes to keep a stash in the freezer, but honestly, that’s only if you’ve got more self-control than me.
Serving Ideas (Or, How I Pretend They’re Fancier)
I like to crumble one into yogurt with fresh berries in the morning or, when we’re feeling extra, drizzle a little melted dark chocolate on top (fancy-pants mode). My brother dunks them in milk, which I thought was a little odd — then I tried it and ate three cups just like that. Oh, and don’t forget to check out Sally’s version of PB oat bars if you want something more bar-shaped — I’m just saying, options!
Pro Tips (Learn from My Mishaps, Please)
- I rushed the fridge step once thinking “eh, it’ll solidify as it sits” — nope, just fell apart the second I bit in. Let them chill, you’ll thank me.
- Don’t over-pack the oats; they actually get a bit dense and tough that way (my first batch could’ve been used as paperweights).
- I tried to melt the peanut butter directly in a metal bowl over the stove. Let’s just say I cleaned up hardened PB for way too long. Use glass or microwave if in doubt! More on this in this handy guide to melting PB.
Questions I’ve Actually Been Asked (Some More Than Once)
- Q: Can I use instant oats?
A: Yep, done it myself loads of times. The cups just come out a bit softer. Good soft, though — like, you could probably eat them with a spoon. - Q: Do they taste okay without chocolate chips?
A: Yeah, for sure. Though, honestly, my kids noticed right away. You can add raisins or chopped nuts instead, or just leave plain — there’s no rules here. - Q: Is it safe to send these in a lunchbox?
A: Absolutely. I’d just pack them with a little ice pack on hot days; otherwise, they start to go a bit melty (lesson learned after one too many sticky apples). - Q: Can I double this recipe?
A: Totally — and you probably should. Just use a bigger bowl; trust me, even if you’re solo, they’ll vanish.
Okay, hope you enjoy making these No Bake Peanut Butter Oat Cups as much as I do. If you get oat bits all over your kitchen, well, welcome to the club. Cupboard raids encouraged. And if you ever find a better combo than peanut butter and oats… I wanna hear about it.
Ingredients
- 1 1/2 cups rolled oats
- 1/2 cup creamy peanut butter
- 1/4 cup honey or maple syrup
- 1/3 cup coconut oil, melted
- 1/2 teaspoon vanilla extract
- 1/4 teaspoon sea salt
- 1/2 cup dark chocolate chips
- 2 tablespoons chopped peanuts (optional)
Instructions
-
1Line a standard muffin tin with paper liners and set aside.
-
2In a mixing bowl, combine rolled oats, peanut butter, honey, melted coconut oil, vanilla extract, and sea salt. Mix until well combined.
-
3Scoop about 2 tablespoons of the mixture into each muffin liner and press down firmly to form a base.
-
4Melt the dark chocolate chips in a microwave-safe bowl in 30-second intervals, stirring in between until smooth.
-
5Spoon melted chocolate over each oat cup. Sprinkle with chopped peanuts, if using.
-
6Refrigerate the tray for at least 2 hours or until the cups are set. Enjoy chilled.
Approximate Information for One Serving
Nutrition Disclaimers
Number of total servings shown is approximate. Actual number of servings will depend on your preferred portion sizes.
Nutritional values shown are general guidelines and reflect information for 1 serving using the ingredients listed, not including any optional ingredients. Actual macros may vary slightly depending on specific brands and types of ingredients used.
To determine the weight of one serving, prepare the recipe as instructed. Weigh the finished recipe, then divide the weight of the finished recipe (not including the weight of the container the food is in) by the desired number of servings. Result will be the weight of one serving.
Did you make this recipe?
Please consider Pinning it!!