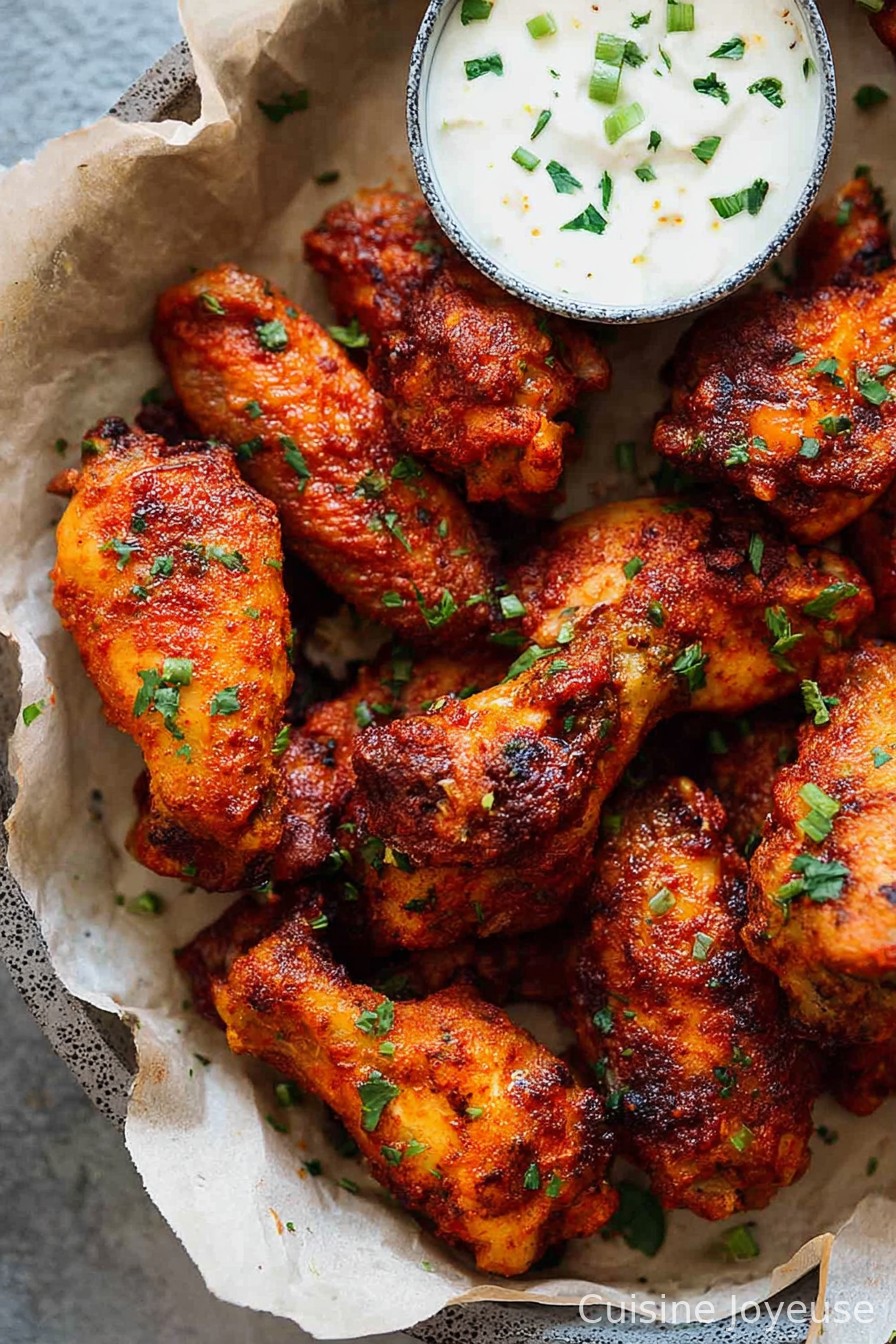
Baked Chicken Wings
So, You Want to Make Baked Chicken Wings?
Alright, before you get all chef-y on me—let me just say, I have a soft spot for chicken wings. We’re talking the kind you eat with your hands, not a fork, and—if you’re like my cousin Dave—with sauce up to your elbows. First time I made baked wings for a game night, I forgot the parchment paper. Big mistake: half the wings tried to permanently glue themselves to the pan. Lesson learned, extra flavor contributed by a bit of burnt skin that night. Ever since, these have become my go-to when I want something easy, fun, and not too fussy. (Also, less splatter on my stovetop. I appreciate any dinner that doesn’t play Jackson Pollock on my kitchen walls.)
Why You’ll Love Making These
I make these when I want something that feels like takeout but tastes… sort of fresher? Maybe it’s psychological, but my family goes crazy for these because they’re crunchy and not deep fried (less oil, less guilt—at least that’s what I tell myself). My kid swears the kitchen smells better than any wing place in town. The real clincher: less mess to clean up. True story, I once tried to pan-fry a batch, got splattered, and ended up applying aloe to one arm. Not my best moment. But baking ‘em, all I worry about is not stealing too many crispy bits before serving.
What You Need (Ingredients)
- About 2 pounds of chicken wings (sometimes I get the party wings, sometimes whole and hack ‘em apart—don’t stress, both work)
- 2 tbsp olive oil (I sometimes grab vegetable oil if I’m out—no one noticed yet)
- 1 ½ tsp salt and a good grind of pepper
- 1 tsp garlic powder (granulated works too—my mom uses this fancy smoked paprika but, honestly, I can’t taste the difference half the time)
- 1 tsp paprika or chili powder (depends how spicy you like it—sometimes I add a pinch of cayenne to wake them up)
- Optional: a sprinkle of baking powder (I saw this on Serious Eats—it actually does help make things crispier, somehow)
How I Do It (Directions, with Digressions)
- First, preheat your oven to 230°C (that’s 450°F for my American readers). Grab a big ol’ baking tray and, if you have it, line with parchment. Otherwise, foil is just fine. Except once I used wax paper and… don’t do that. Wax gets everywhere.
- While that heats, pat the wings dry. Like, actually dry—it helps with crispiness. I used to skip this and wondered why my wings were a bit, uh, floppy. Learn from me.
- Toss the wings with olive oil, salt, pepper, garlic powder, paprika (or chili), and that optional pinch of baking powder. I usually just use my hands—if you have a big bowl, great, but sometimes I just use a ziploc bag for less washer-uppering.
- Spread them out on your tray. Make sure there’s a bit of space between ‘em. This was a hard one for me, since I like to cram everything onto one pan (lazy washing up), but they really crisp better spaced out.
- Bake for about 25 minutes, flip all the wings, then bake for another 15–25. This is the bit where I end up sneaking one to “test” doneness—just don’t burn your mouth! They should be golden, with little crispy edges. If they look a bit pale, let ‘em go a little longer. Trust your instincts; mine are generally hungry.
- Let wings rest a couple minutes. Or don’t—no judgment, but I think the skin stays snappier if you wait a bit.
- Serve hot, with your choice of sauce or straight up. (Sometimes I just swipe bottled buffalo sauce, no shame.)
Things I’ve Learned (Notes)
- I definitely think the wings are crispier if you let them sit on a rack above the pan, but frankly, I only bother with that when I’m not too tired after work.
- If you use frozen wings, thaw them properly first—last time I didn’t, I ended up with soggy, pale wings and a puddle in my oven tray (yikes).
- Too much baking powder makes them taste weirdly metallic (ask me how I know). A little goes a long way!
Wing Experiments (Variations and One Mishap)
- Once tried brushing with teriyaki sauce before baking—got a sort of candied effect that’s tasty, if a tad sticky.
- Lemon pepper seasoning instead of garlic? Really good, especially in summer.
- Tried honey mustard glaze after baking, and… well, maybe the combo was a bit much. It slid off and pooled underneath (don’t do what I did, mix a little cornstarch in if you’re feeling fancy).
Equipment (and What to Do If You Don’t Have It)
- Baking tray or sheet (any large oven-proof thing works, honestly)
- Some swear by a rack so the fat drips below, but I usually just lay parchment down
- Bowl or big bag for mixing—if you don’t have one, just toss ingredients right on the tray (on second thought, maybe mix at least the salt in something first)
How Do I Store These? (If Leftovers Exist)
Technically you can store cooled wings in an airtight container in the fridge for 2–3 days. But honestly, in my house, it never lasts more than a day. If you do have leftovers, pop them on a tray to reheat at 200°C (400°F) for 10 minutes—they crisp back up nicely. Microwaving will do in a pinch, but you’ll lose the crispy magic.
How I Like to Serve ‘Em
I love to plop these on a big platter, scatter a little chopped parsley or green onion over for “health,” and put out a bowl of blue cheese dressing. Ranch works too (see Inspired Taste for an easy homemade recipe). My family tradition is to serve celery sticks and carrot sticks on the side, but I have a pal who despises celery so… do you.
What I Wish I’d Known (Pro Tips)
- I tried rushing the drying step once and got limp wings. Don’t be like me; let them sit a few extra minutes if you can.
- Don’t pile them up on the tray. I once decided to bake a double batch all squished together, and got a sad tray of steamed chicken instead. Fill two trays if you must.
FAQ (Or: Things People Actually Ask Me)
- Can I use drumsticks instead of wings?
Sure, mate, just bake ‘em a bit longer. They’re chunkier, so give ‘em maybe 10 minutes extra, and check they’re cooked through. - Are these gluten free?
Yep, unless you start adding flour or a sauce that has gluten. Always check your labels, though. - Can I do this in an air fryer?
Honestly, I’ve only tried it once and nearly smoked out the kitchen, but my friend swears by it. Go for 200°C (around 400°F) and shake the basket halfway through. - How do I make them really spicy?
Add a generous pinch of cayenne or finely chopped fresh chili to your spice mix, or toss in your favourite hot sauce after baking. Don’t blame me if you burn your tastebuds off (been there, done that). - Why do my wings stick to the pan?
Happened to me too. Make sure they’re oiled well and the tray is lined. Parchment is your friend here (unlike, say, that wax paper incident).
P.S. Totally random—don’t you think kids these days are missing out, never having to barter for the last wing at the dinner table? Makes me nostalgic. Anyway, happy baking; let me know if your tray ends up cleaner than mine (doubt it!).
Ingredients
- 2 lbs chicken wings
- 2 tablespoons olive oil
- 1 tablespoon garlic powder
- 1 tablespoon paprika
- 1 teaspoon salt
- 1 teaspoon black pepper
- 1 teaspoon onion powder
- 1/2 teaspoon cayenne pepper
- 2 tablespoons chopped fresh parsley (optional, for garnish)
Instructions
-
1Preheat the oven to 425°F (220°C). Line a baking sheet with parchment paper or aluminum foil and place a wire rack on top.
-
2Pat the chicken wings dry with paper towels and place them in a large mixing bowl.
-
3Drizzle the olive oil over the wings and toss to coat evenly.
-
4In a small bowl, mix together the garlic powder, paprika, salt, black pepper, onion powder, and cayenne pepper. Sprinkle the spice mixture over the wings and toss until thoroughly coated.
-
5Arrange the wings in a single layer on the prepared rack. Bake for 40 minutes or until the wings are golden brown and crispy, flipping them halfway through.
-
6Remove from the oven and let cool for a few minutes. Garnish with chopped parsley if desired and serve hot.
Approximate Information for One Serving
Nutrition Disclaimers
Number of total servings shown is approximate. Actual number of servings will depend on your preferred portion sizes.
Nutritional values shown are general guidelines and reflect information for 1 serving using the ingredients listed, not including any optional ingredients. Actual macros may vary slightly depending on specific brands and types of ingredients used.
To determine the weight of one serving, prepare the recipe as instructed. Weigh the finished recipe, then divide the weight of the finished recipe (not including the weight of the container the food is in) by the desired number of servings. Result will be the weight of one serving.
Did you make this recipe?
Please consider Pinning it!!