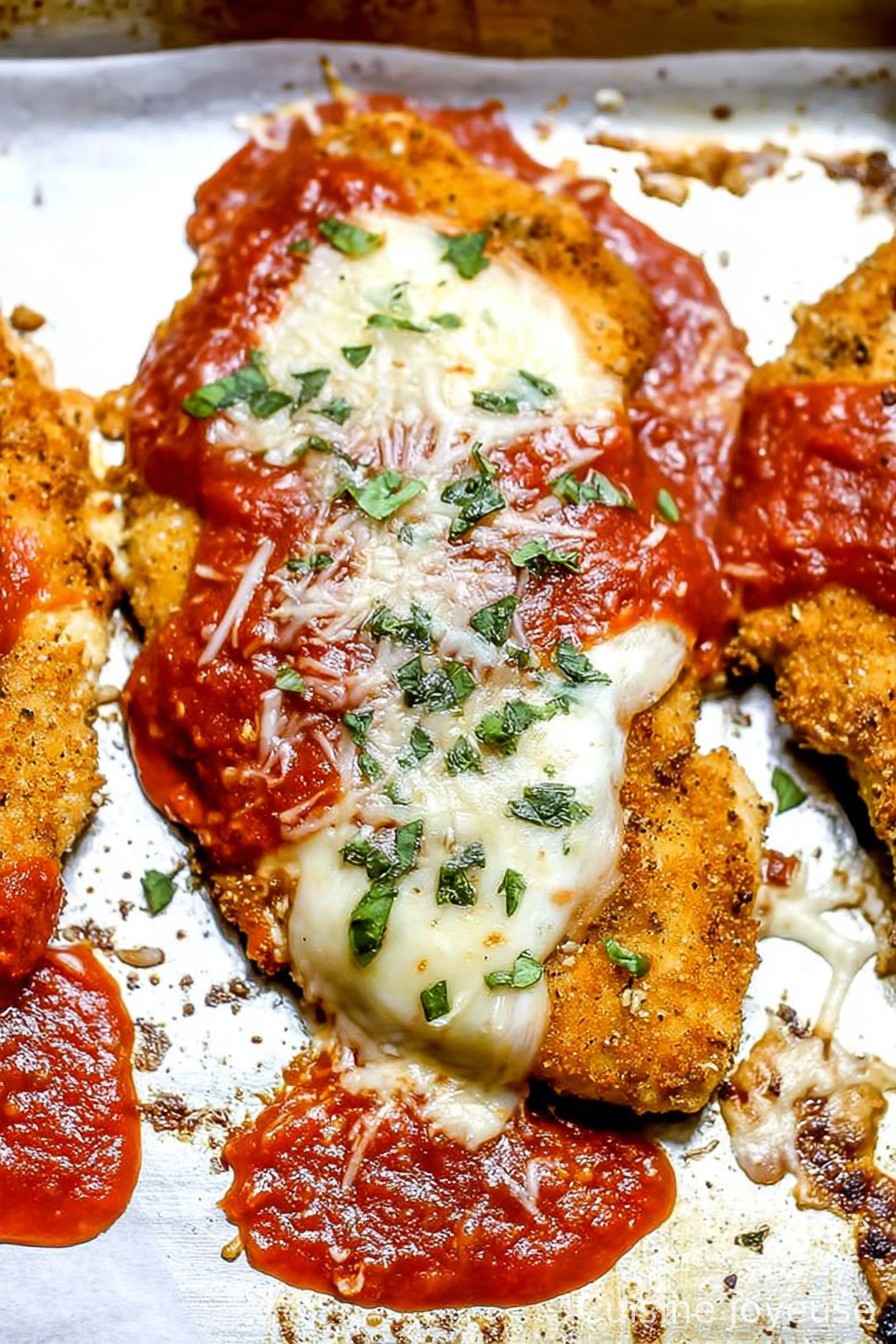
Baked Chicken Parmesan
You Ready for the Best Baked Chicken Parmesan?
I have to confess, the very first time I made baked chicken parmesan (way back in my teens), I completely fused the foil to the cheese. Rookie mistake, but hey, every family’s gotta have that one kitchen learning disaster, right? My little brother refers to it as “that unforgettable crunchy cheese surprise.” But ever since I got the hang of it, this recipe has been my steady fallback when I want something that hits the sweet spot between fancy-ish and I-can-pull-this-off-on-a-Monday. Also, it’s baked not fried, so you feel like you’re making healthier choices… until you go wild with the cheese, but what can ya do?
Why You’ll Love This (Or at Least, Why I Do)
I make this whenever I’ve had one of those days where I want something comforting that seems like a lot of effort but honestly, isn’t all that hard. My family goes nuts for it because it’s got crispy bits, melty cheese, and it smells so, so homey while cooking. We’ve even had it for a birthday dinner—don’t let anyone tell you chicken can’t be festive! Plus, there’s just something heroic about pulling a golden bubbling pan of chicken out of the oven without burning your wrist (I mean, most of the time… sometimes I’m just unlucky with oven mitts).
What Ingredients You Actually Need
- 4 boneless, skinless chicken breasts (sometimes I get the thin ones; if they’re huge, just butterfly ’em!)
- 1 cup Italian-style breadcrumbs (I’ve swapped in panko with a sprinkle of Italian seasoning when I ran out and, honestly, nobody noticed)
- ½ cup grated parmesan cheese (the stuff in the green can is totally fine when you don’t have the fancy stuff)
- 2 cups marinara sauce (homemade is awesome, but jarred is what I usually use; Rao’s is grand but, look, any brand works)
- 1½ cups shredded mozzarella cheese (sometimes I toss in a handful of provolone, too—it gets super gooey)
- 2 large eggs, beaten (if you forget to take the eggs out of the fridge before, just run them under warm water for a sec)
- 1 cup all-purpose flour (use whole wheat if you must… but I never do)
- 2 tablespoons olive oil (I use whatever’s in the cupboard. Last time it was “extra light”—didn’t taste any different!)
- Salt and pepper to taste
- Fresh basil or parsley for topping (totally optional, but it looks fancier with it)
How I Actually Make It (Step-by-Step-ish)
- First: Preheat your oven to 425°F (220°C). If you’re like me and forget, you’ll be sitting around twiddling your thumbs later.
- Set up a little assembly line. Three shallow bowls: one with flour (add a good pinch of salt, maybe some pepper), next with the beaten eggs, and last with a mix of breadcrumbs and parmesan cheese. This is where you lay out wax paper if you’re feeling fancy or just a messy kitchen towel (which is how I roll).
- Pound chicken breasts to about ½ inch thick. (I wrap them in clingfilm and wallop them with a rolling pin; meat mallet is best, but I don’t own one. One time, I tried a heavy mug. Not recommended, unless you like washing dishes.)
- Coat each piece in flour, then dip in egg, then dredge all over in the breadcrumb-parm combo. Give ’em a little press so the crumbs really stick. Bits will fall off no matter what; don’t stress.
- Grab a big oven-proof skillet or just use a baking sheet. Drizzle the olive oil on the bottom (not strictly necessary, but the bottom gets crispier). Arrange the chicken pieces in a single layer so they don’t wrestle for space.
- Pop the chicken in the oven and bake for 15 minutes. (I sometimes sneak a peek at this point—if I have a little time, I’ll turn the pieces over, but if not, it’s all good!)
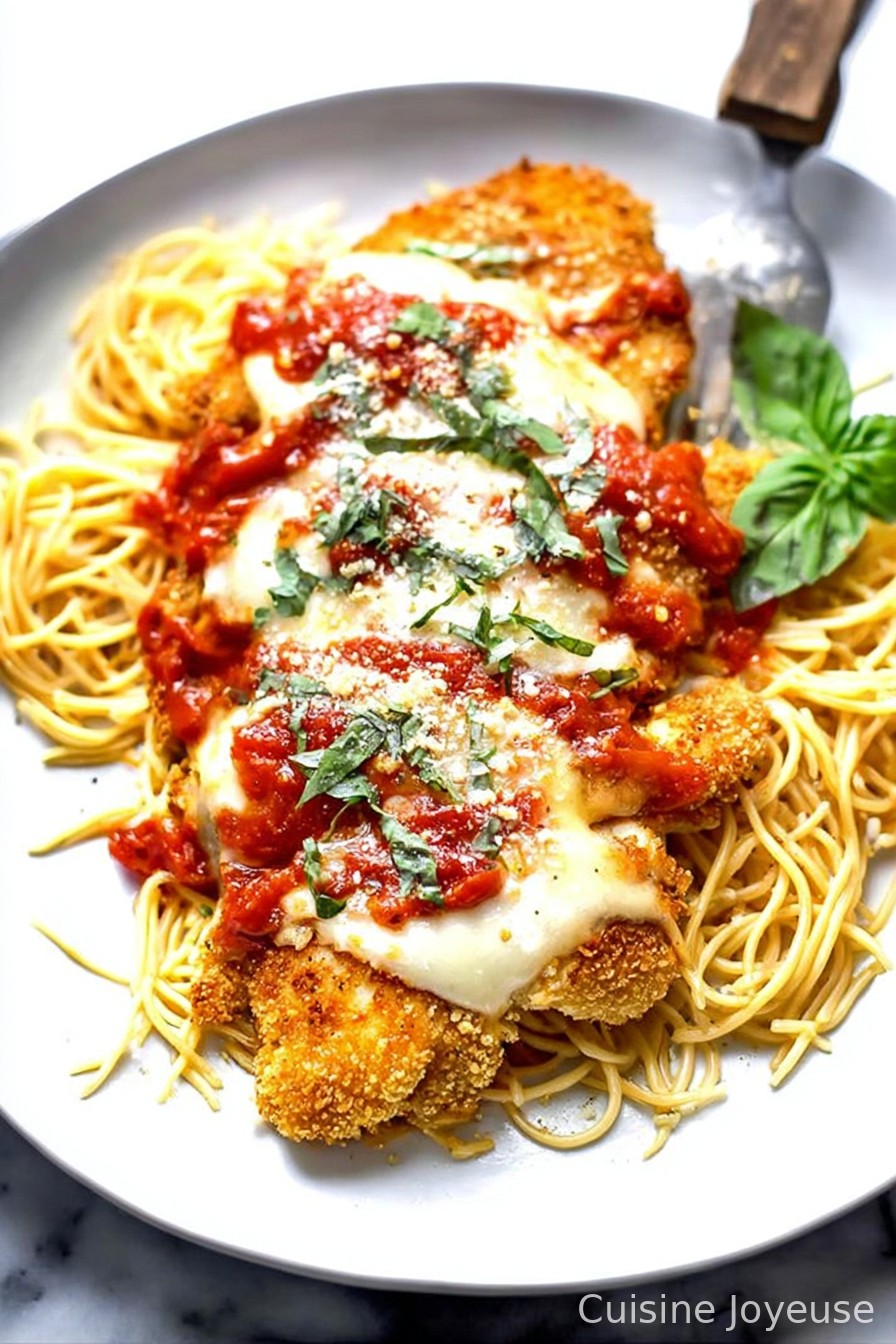
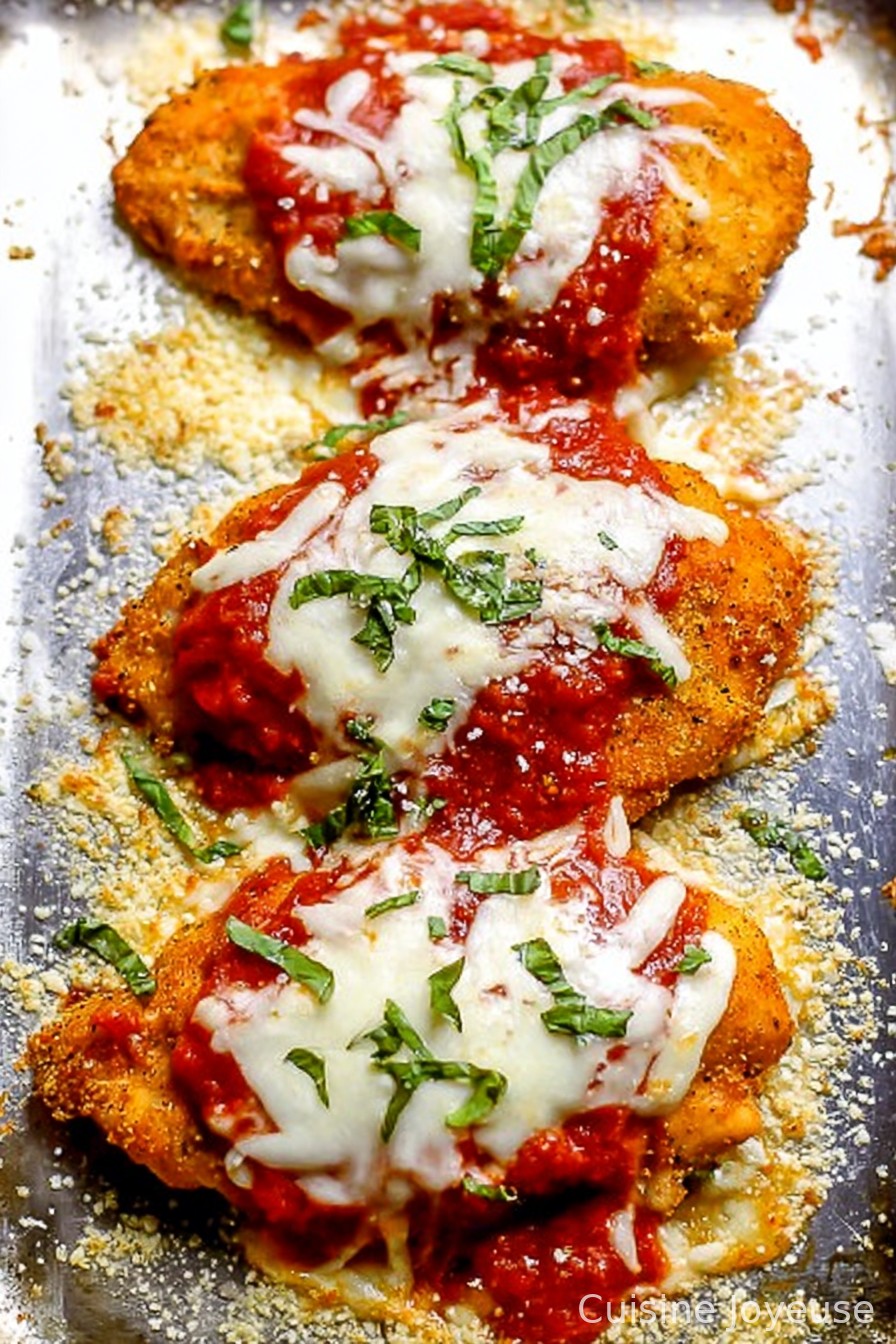
- Take the skillet out, spoon generous heaps of marinara sauce on each piece, then sprinkle mozzarella (and provolone if you remembered) on top. Don’t skimp. If it looks like too much, trust me—it isn’t.
- Back in the oven it goes for another 10–12 minutes, or until the cheese is melty and bubbling and starting to go gold in spots. If you’re a crispy cheese fan, you can broil it for 1–2 minutes, but keep an eye out so it doesn’t cross over into burnt toast territory.
- Let it sit for 5 minutes before digging in. This is the hardest part because it smells so good, but if you cut it too soon the cheese makes a run for it.
- Scatter chopped basil or parsley on top if you’re feeling all chef-y. Serve and watch everyone fight for the cheesiest bit!
Not-So-Secret Notes From My Kitchen
- If you overbake the chicken, it goes a bit dry but just drown it in extra sauce—that’s my fix!
- Breadcrumbs too fine? I’ve pulsed stale bread in the blender, worked a charm. Ritz crackers? Odd, but okay in a pinch.
- Sometimes I swap mozzarella for cheddar if that’s all I’ve got. The flavor is weird, but not bad (just don’t tell any nonnas).
Variations I’ve Actually Tried (Some More Successful Than Others)
- Eggplant parm version: Just slices of eggplant instead of chicken. Worked, but my family claimed it was “just okay.” (Sorry, vegetarians!)
- Spice it up: A dash of chili flakes in the sauce, or a splash of hot honey on top. Unexpected but kinda great.
- I tried gluten-free breadcrumbs one night and honestly, it wasn’t for me. Maybe you’ll have better luck!
Do You Really Need Fancy Equipment?
An oven, obviously, and ideally a big skillet that can go from stovetop to oven. But I’ve done it on a sharp-edged cookie sheet—just throw a little foil or parchment down. Don’t sweat it if you don’t have a meat mallet, like I said, anything heavy sort of works, just don’t use Grandma’s good rolling pin (trust me, it gets greasy).
How I (Barely) Manage to Store Leftovers
Technically, pop leftovers in an airtight container in the fridge; they’ll last 2 or 3 days. In real life: they’re gone after lunch the next day, if not sooner. Chicken parm sandwiches the next day? Absolutely worth making extra for. Freezes okay (if you wrap it tight), but the crumb goes a bit soggy on defrosting.
Serving: The Fun Stuff
We almost always have this with spaghetti (classic!) and sometimes a big crunchy Caesar salad on the side. My uncle always asks for a side of garlic bread—more carbs, more happiness. Every once in a blue moon I do a pile of steamed broccoli if I’m feeling like redeeming myself health-wise.
Pro Tips (Learned the Hard Way)
- Don’t skip pounding the chicken—it really helps it cook evenly. I rushed this once and had raw bits. That was a sad day.
- Cheese will try to ooze off; it’s okay. Actually, those crispy bits around the edge are the best part.
- If the sauce seems super watery out of the jar, simmer it for 10 min first or you’ll get a soggy mess. Learned that one the messiest way possible.
Real Questions I’ve Actually Been Asked (and My Answers!)
- Can I make this ahead? Yep, but add the sauce and cheese right before baking so it doesn’t soak through and get weird.
- Do I have to use chicken breasts? Nah, I’ve made this with thighs. Just takes a bit longer to cook, but honestly, juicier in my opinion.
- What if I don’t have breadcrumbs? I’ve used crushed cornflakes once—odd crunch, but not a disaster.
- Is it better the next day? Actually, sometimes I think it is. Cold chicken parm sandwiches are a true joy of life. Try it!
- Help! My cheese always goes rubbery. Why? Could be overbaking or a cheese that’s got weird fillers. Try slicing fresh mozzarella yourself. Or just eat it while it’s hot.
- (And no, you don’t have to serve it with pasta. I had a cousin eat it with chips once… not bad, though not exactly traditional.)
Oh, random aside—my neighbor swears by adding a pinch of nutmeg to her marinara sauce. I tried it once. It was… interesting. Maybe stick with basil for now.
Ingredients
- 4 boneless, skinless chicken breasts (sometimes I get the thin ones; if they’re huge, just butterfly ’em!)
- 1 cup Italian-style breadcrumbs (I’ve swapped in panko with a sprinkle of Italian seasoning when I ran out and, honestly, nobody noticed)
- ½ cup grated parmesan cheese (the stuff in the green can is totally fine when you don’t have the fancy stuff)
- 2 cups marinara sauce (homemade is awesome, but jarred is what I usually use; Rao’s is grand but, look, any brand works)
- 1½ cups shredded mozzarella cheese (sometimes I toss in a handful of provolone, too—it gets super gooey)
- 2 large eggs, beaten (if you forget to take the eggs out of the fridge before, just run them under warm water for a sec)
- 1 cup all-purpose flour (use whole wheat if you must… but I never do)
- 2 tablespoons olive oil (I use whatever’s in the cupboard. Last time it was “extra light”—didn’t taste any different!)
- Salt and pepper to taste
- Fresh basil or parsley for topping (totally optional, but it looks fancier with it)
Instructions
-
1First: Preheat your oven to 425°F (220°C). If you’re like me and forget, you’ll be sitting around twiddling your thumbs later.
-
2Set up a little assembly line. Three shallow bowls: one with flour (add a good pinch of salt, maybe some pepper), next with the beaten eggs, and last with a mix of breadcrumbs and parmesan cheese. This is where you lay out wax paper if you’re feeling fancy or just a messy kitchen towel (which is how I roll).
-
3Pound chicken breasts to about ½ inch thick. (I wrap them in clingfilm and wallop them with a rolling pin; meat mallet is best, but I don’t own one. One time, I tried a heavy mug. Not recommended, unless you like washing dishes.)
-
4Coat each piece in flour, then dip in egg, then dredge all over in the breadcrumb-parm combo. Give ’em a little press so the crumbs really stick. Bits will fall off no matter what; don’t stress.
-
5Grab a big oven-proof skillet or just use a baking sheet. Drizzle the olive oil on the bottom (not strictly necessary, but the bottom gets crispier). Arrange the chicken pieces in a single layer so they don’t wrestle for space.
-
6Pop the chicken in the oven and bake for 15 minutes. (I sometimes sneak a peek at this point—if I have a little time, I’ll turn the pieces over, but if not, it’s all good!)
-
7Take the skillet out, spoon generous heaps of marinara sauce on each piece, then sprinkle mozzarella (and provolone if you remembered) on top. Don’t skimp. If it looks like too much, trust me—it isn’t.
-
8Back in the oven it goes for another 10–12 minutes, or until the cheese is melty and bubbling and starting to go gold in spots. If you’re a crispy cheese fan, you can broil it for 1–2 minutes, but keep an eye out so it doesn’t cross over into burnt toast territory.
-
9Let it sit for 5 minutes before digging in. This is the hardest part because it smells so good, but if you cut it too soon the cheese makes a run for it.
-
10Scatter chopped basil or parsley on top if you’re feeling all chef-y. Serve and watch everyone fight for the cheesiest bit!
Approximate Information for One Serving
Nutrition Disclaimers
Number of total servings shown is approximate. Actual number of servings will depend on your preferred portion sizes.
Nutritional values shown are general guidelines and reflect information for 1 serving using the ingredients listed, not including any optional ingredients. Actual macros may vary slightly depending on specific brands and types of ingredients used.
To determine the weight of one serving, prepare the recipe as instructed. Weigh the finished recipe, then divide the weight of the finished recipe (not including the weight of the container the food is in) by the desired number of servings. Result will be the weight of one serving.
Did you make this recipe?
Please consider Pinning it!