Mini Cinnamon Rolls
Okay, Let’s Talk Mini Cinnamon Rolls (and My Slight Obsession)
Picture this: it’s a rainy Sunday, and you’re craving something sweet but don’t want to commit to a whole tray of cinnamon rolls that could feed a rugby team. That’s basically how these mini cinnamon rolls made their way into my kitchen. I remember the first time I made them, I got a little carried away with the filling (I mean, is it even possible to have too much cinnamon sugar?), and the whole batch ended up looking kind of wonky, but honestly, they tasted amazing. My brother walked in, grabbed five, and called them “breakfast snacks.” He wasn’t wrong. These are way easier than big cinnamon rolls and, in my humble opinion, a lot more fun to eat. Also, they disappear faster than socks in the dryer.
Why You’ll Love This—No, Really
I make these mini cinnamon rolls when I want to impress people without actually working that hard. My family goes absolutely bonkers for these—sometimes I sneak a couple before they hit the plate because otherwise, I swear, I don’t stand a chance. They’re perfect for brunch, after-school snacks, or, let’s be honest, breakfast on the couch with a mug of coffee (I may or may not have done this last Tuesday). And if you’ve ever tried wrestling with dough before and ended up with flour everywhere, well, you’re in good company. But—these are honestly pretty forgiving. Even if you roll them up all lopsided, they still bake up cute as buttons.
What You’ll Need (And What You Can Substitute)
- 1 can refrigerated crescent roll dough (sometimes I use pizza dough in a pinch, but it’s a bit more chewy—still tasty though!)
- 3 tbsp unsalted butter, melted (salted works too; just skip the extra pinch of salt later)
- 1/4 cup packed brown sugar (granulated sugar is okay if you’re out—has a different vibe, but not in a bad way)
- 1.5 tsp ground cinnamon (sometimes I just eyeball it, I’ll admit)
- Pinch of salt (My gran insisted on Maldon flakes, but any salt does the trick)
- For the glaze: 1/2 cup powdered sugar, 1 tbsp milk or cream, 1/4 tsp vanilla extract (I’ve even used almond extract once, which was… interesting. Not bad, but a bit perfumey)
Here’s How You Actually Make Them
- First off, heat your oven to 350°F (175°C). Grab a muffin tin and give it a spritz of nonstick spray. Or just smear some butter around—either works.
- Unroll your dough on a lightly floured surface. Try to pinch together the seams if you’re using crescent rolls; it’ll make rolling easier. (This is where it’s totally normal if it looks kind of Frankenstein-ish.)
- Brush the melted butter over the surface, then sprinkle on the brown sugar, cinnamon, and that little pinch of salt. Sometimes I add extra cinnamon because I can’t help myself.
- Roll it up (gently, but you don’t have to be precious about it) into a log, then use a sharp knife or even dental floss to slice into about 12 mini rolls. They don’t have to be exactly even. Honestly, the squishy, oddball ones are the best.
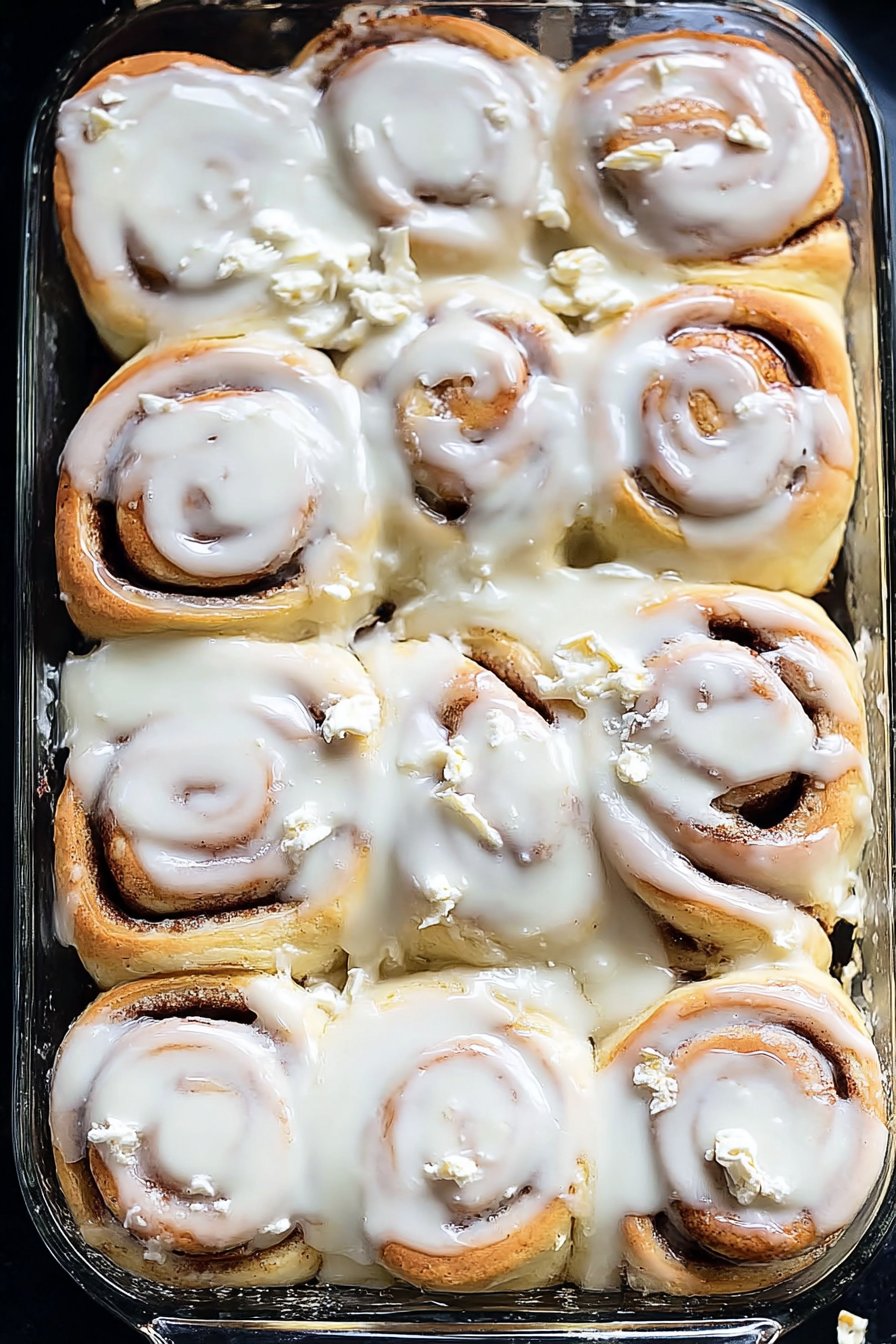
- Arrange the spirals cut-side up in your muffin tin. If you have leftovers, just pop them on a baking tray.
- Bake for 12–15 minutes, or until they’re puffed up and golden. Sometimes they bake a little unevenly—just swap the tray around halfway if your oven’s as moody as mine.
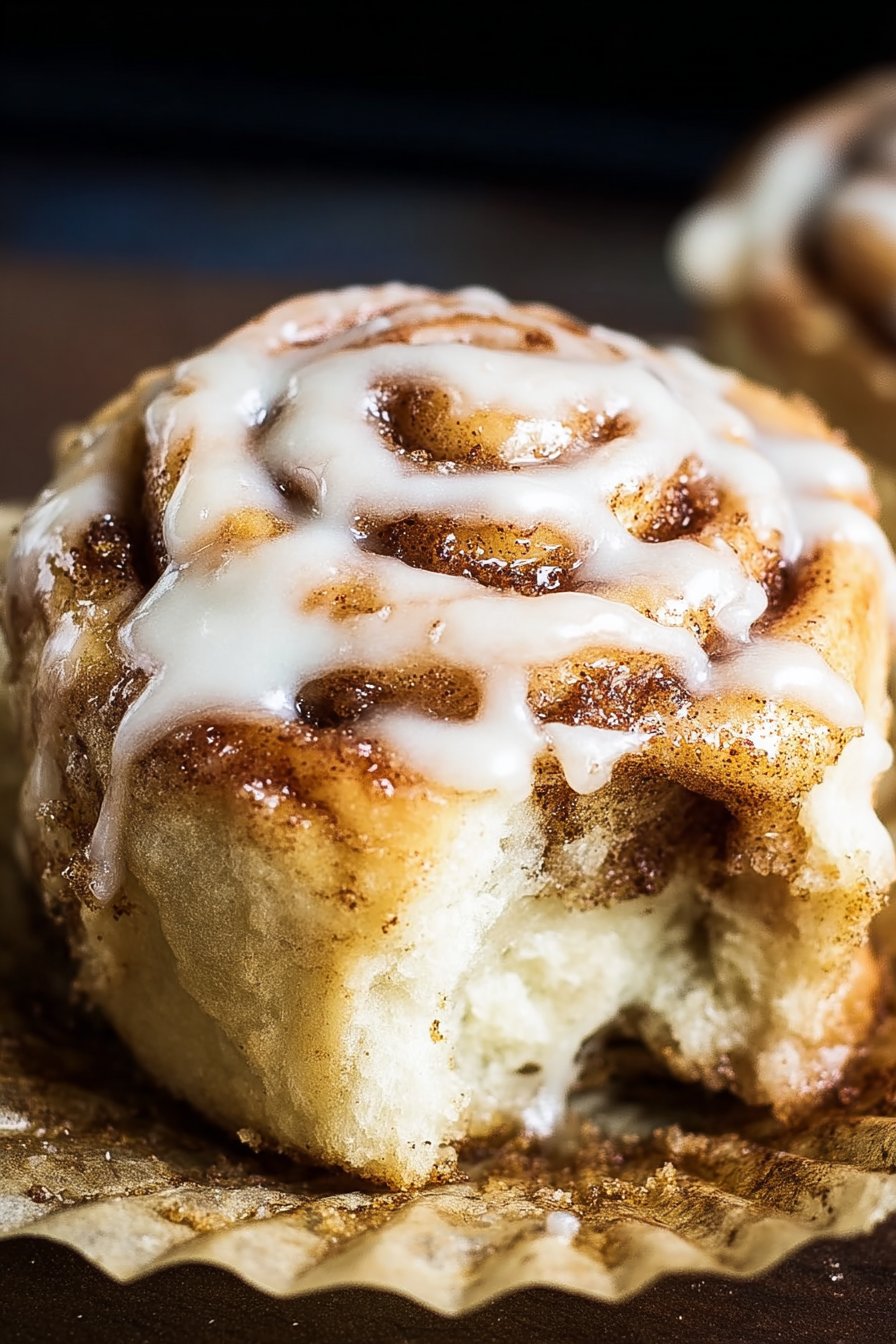
- Let them cool a few minutes before drizzling with glaze. This is when I usually steal one because, you know, quality control.
- Mix up the glaze (powdered sugar, milk, vanilla) and spoon or drizzle it over the warm rolls. Or just dunk them straight in if you’re feeling wild.
Some Notes From My Many Attempts
- I used to bake these directly on a tray, but they spread out into weird amoeba shapes. Muffin tins make them so much cuter.
- If you want them extra gooey, use a bit more butter and sugar. I mean, why not?
- Actual cinnamon sticks, ground fresh, pack way more flavor—but I can’t always be bothered, honestly.
Variations I’ve Tried (And One I Wouldn’t Recommend Again)
- Added chopped pecans or walnuts to the filling (this is amazing, especially if you like a bit of crunch).
- Used orange zest in the glaze for a brunchy spin—nice, though my friend thought it tasted like Christmas potpourri.
- Tried chocolate chips once. They kind of melted out and made a mess, but the crispy bits were tasty. Maybe don’t go overboard with these.
Equipment—But Only If You Have It
- Muffin tin (but honestly, a baking tray lined with parchment works if you don’t mind odd shapes).
- Rolling pin, or just use a wine bottle. It works in a pinch, and sometimes it’s closer to hand anyway.
- Sharp knife or dental floss for slicing (I’ve used a butter knife before; it smushes them, but they’re still tasty).
Storing Your Mini Cinnamon Rolls (Not That They’ll Last Long)
You can keep these in an airtight container at room temp for 2 days. Or in the fridge for 4-ish days. But honestly, in my house, they never last more than a day! They reheat pretty nicely in the microwave for 10 seconds, just enough to get that melty glaze again.
How I Like to Serve These (And A Little Family Tradition)
I love piling these up on a big platter with extra glaze drizzled all over. My niece dips hers in hot cocoa, which is adorable. Or sometimes we serve them with fresh berries and a dollop of whipped cream at brunch—feels fancy, but it’s still just cinnamon rolls, you know?
Pro Tips (Learned the Hard Way)
- I once tried to rush rolling up the dough when it was too cold, and it cracked everywhere. Let it sit at room temp a few minutes and it’ll be way more cooperative.
- Don’t skimp on the butter. I tried to make a “healthier” version once… never again. Dry city.
You Asked, I Answered (Mini Cinnamon Roll FAQ)
- Can I make these ahead? Yep! You can assemble the rolls & pop in the fridge overnight. Bake fresh in the morning. Or bake and reheat, but they taste best the day of, in my opinion.
- Do I have to use canned dough? Not at all! If you want to go all out, homemade dough is ace. Sally’s recipe is my go-to when I have the time (which is rare, if I’m honest).
- Why did my rolls come out flat? Could be the dough was too warm or you didn’t roll them tight enough. But hey, they still taste good!
- Can I freeze them? Yes! Wrap tightly after baking, then thaw and reheat. Glaze after reheating, or freeze glazed—works both ways, though I like to do it fresh.
- What if I don’t have powdered sugar for the glaze? Been there. You can blitz regular sugar in a blender, or skip the glaze and eat them plain. Or try this quick icing recipe with cream cheese.
Small Digression (Because Why Not?)
Side note—I once tried to make these at a campsite. Turns out, cooking them over an open fire makes for a very “rustic” dessert. Charcoal is not a flavor I’d recommend, but hey, live and learn.
Ingredients
- 1 sheet refrigerated crescent roll dough
- 2 tablespoons unsalted butter, melted
- 1/4 cup brown sugar, packed
- 1 tablespoon ground cinnamon
- 1/4 teaspoon vanilla extract
- 1/3 cup powdered sugar
- 1 tablespoon milk
- Pinch of salt
Instructions
-
1Preheat the oven to 180°C (350°F) and lightly grease a mini muffin tin.
-
2Unroll the crescent roll dough onto a lightly floured surface and brush with melted butter.
-
3In a small bowl, mix together brown sugar and cinnamon. Sprinkle the mixture evenly over the buttered dough.
-
4Roll the dough tightly into a log and slice into 16 equal pieces. Place each piece cut-side up into the prepared muffin tin.
-
5Bake for 12-15 minutes, or until golden brown. Remove from oven and let cool slightly.
-
6Whisk together powdered sugar, milk, vanilla extract, and a pinch of salt to make the glaze. Drizzle over the warm mini cinnamon rolls before serving.
Approximate Information for One Serving
Nutrition Disclaimers
Number of total servings shown is approximate. Actual number of servings will depend on your preferred portion sizes.
Nutritional values shown are general guidelines and reflect information for 1 serving using the ingredients listed, not including any optional ingredients. Actual macros may vary slightly depending on specific brands and types of ingredients used.
To determine the weight of one serving, prepare the recipe as instructed. Weigh the finished recipe, then divide the weight of the finished recipe (not including the weight of the container the food is in) by the desired number of servings. Result will be the weight of one serving.
Did you make this recipe?
Please consider Pinning it!!