Instant Pot Chicken Thighs
Let’s Talk: My Lazy-Day Instant Pot Chicken Thighs
Alright, so let me be honest—I’m not always the most organized home cook. The first time I made Chicken Thighs in the Instant Pot, I was less “chef extraordinaire” and more “desperate parent eyeballing a clock.” My kids were hangry, I was tired (when am I not?) and, full confession, the Chicken Thighs were mostly thawed but a little frosty in the middle. Anyway, out came the trusty Instant Pot, and I’ve never really looked back. Plus, there’s this one time I dropped a thigh on the floor and my dog thought I’d developed superpowers—chicken everywhere, laughter, hardly any dinner left for me. So yeah, these are real-life Instant Pot Chicken Thighs: as beloved as they are slightly chaotic.
Why You’ll Love This
I make this dish when the week gets away from me—it’s the kind of recipe that forgives you for not planning ahead. My family goes bananas for it because, honestly, the chicken comes out super juicy (even if you forget to defrost.) I love how there’s barely any cleanup after, so I’m not stuck scrubbing pans for ages. Sometimes I get fancy and do a quick broil at the end for crispy skin, but mostly, we’re all just standing around the kitchen eating sticky pieces with our fingers like barbarians. No judgment. If you’ve ever tried oven-roasting and ended up with bland chicken (been there), this is pretty much foolproof, and thanks to the pressure, the flavor seeps all the way in. Oh, and you can change up the seasonings whenever your tastebuds want to travel—sometimes that’s my only vacation.
Gathering Your Ingredients (Substitution Welcome!)
- 6 bone-in, skin-on chicken thighs (I’ve used boneless, skinless in a pinch, but those get less juicy. Up to you!)
- 1 tablespoon olive oil (or whatever’s handy—avocado oil works, too. My gran used lard but… that’s her style)
- 1 teaspoon kosher salt (table salt is fine—”salt is salt,” my uncle says, slightly incorrectly)
- 1/2 teaspoon black pepper
- 1 teaspoon paprika (smoked or sweet both go brilliantly, or swap in chili powder for some bite)
- 1 teaspoon garlic powder (I’ve thrown in fresh minced garlic before—tastes a bit sharper, which is nice and chaotic but leaves bits in the sauce. Up to you!)
- 1/2 teaspoon onion powder
- 1 cup chicken broth (I sometimes mix in water if I’m running short; it still works—just a bit less traditional)
- 1 tablespoon soy sauce (or Worcestershire sauce for a deeper flavor—truthfully, I’ve mixed them by accident, and it was actually good.)
How I Throw This Together (with Occasional Tangents)
- Pat the chicken dry with paper towels. Not mandatory but gives you crispier skin (sometimes I’m too impatient and just skip to step two. Still edible!).
- Mix the salt, pepper, paprika, garlic powder, and onion powder in a little bowl. Sprinkle this all over the chicken thighs. Massage it in, unless raw chicken freaks you out—use tongs if that’s your vibe.
- Set the Instant Pot to “Sauté” and add the olive oil. (If your Instant Pot doesn’t have Sauté, just turn it on for a minute to heat things up.) Place the thighs skin-side down in the pot—work in two batches if you have to. Brown them for about 2–3 minutes per side. Don’t panic if they stick a little, they’ll loosen.
- Take out the browned thighs and set them aside. Now, pour in about a quarter of the chicken broth and scrape the bottom with a wooden spoon. This is called “deglazing” but I just call it getting the crispy bits, which are honestly the best part.
- Put the chicken thighs back in, skin-side up. Pour in the rest of the chicken broth and drizzle over the soy sauce. If some thighs are sitting awkwardly – it’s fine, just squish ‘em in.
- Lock the Instant Pot lid, set the valve to “Sealing,” and pressure cook on High for 10 minutes. (If using boneless, you can get away with 8 minutes but I usually forget and it comes out fine.) The pot will take a few minutes to come to pressure – use the time to, I dunno, do some kitchen dancing or answer work emails or whatever.
- When the timer beeps, let it sit for 5 minutes (this is called natural release. One time, I skipped it and ended up with very excitable steam. Just let it chill a bit.) After that, take care flipping the valve for a quick release—watch out for the steamy whoosh.
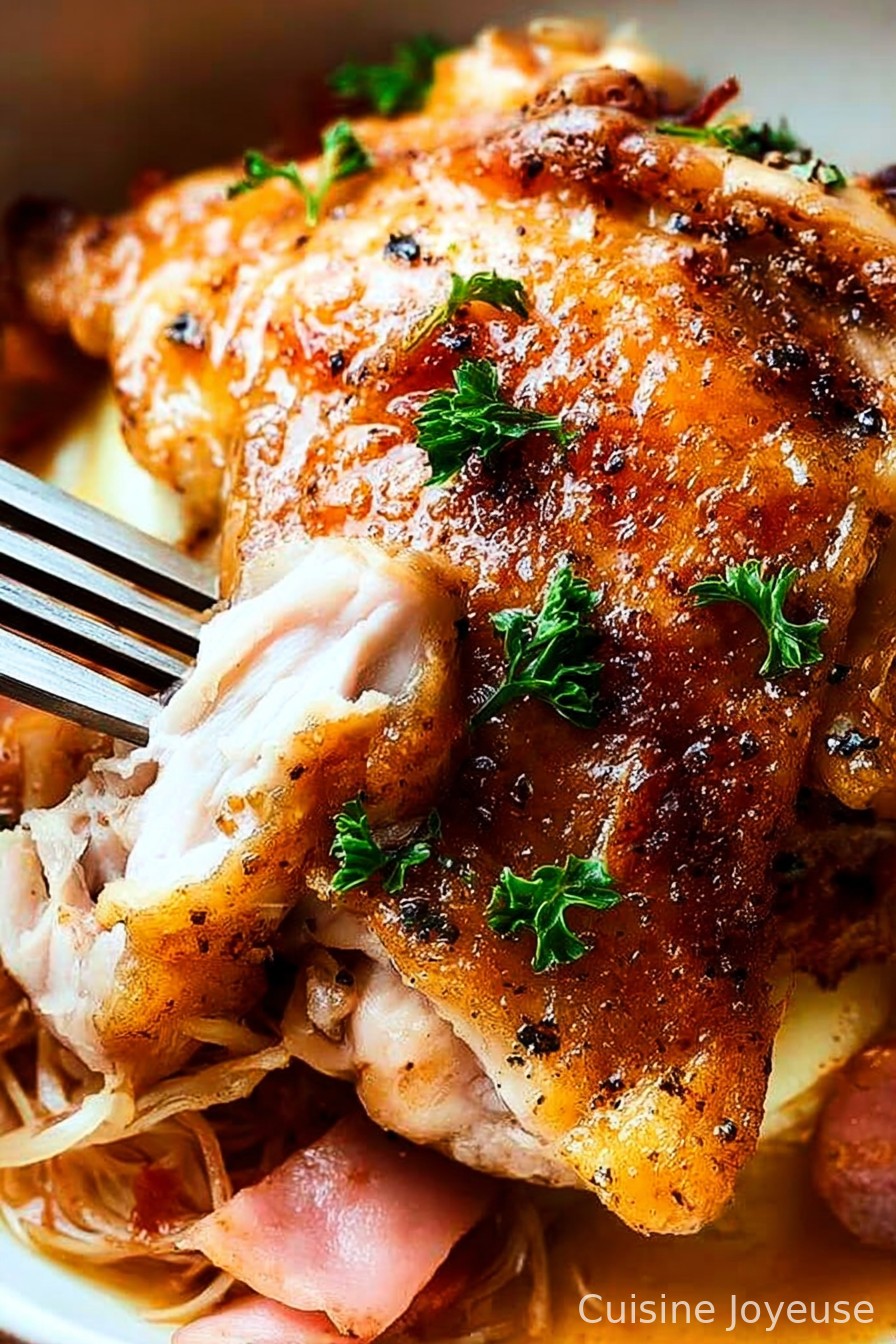
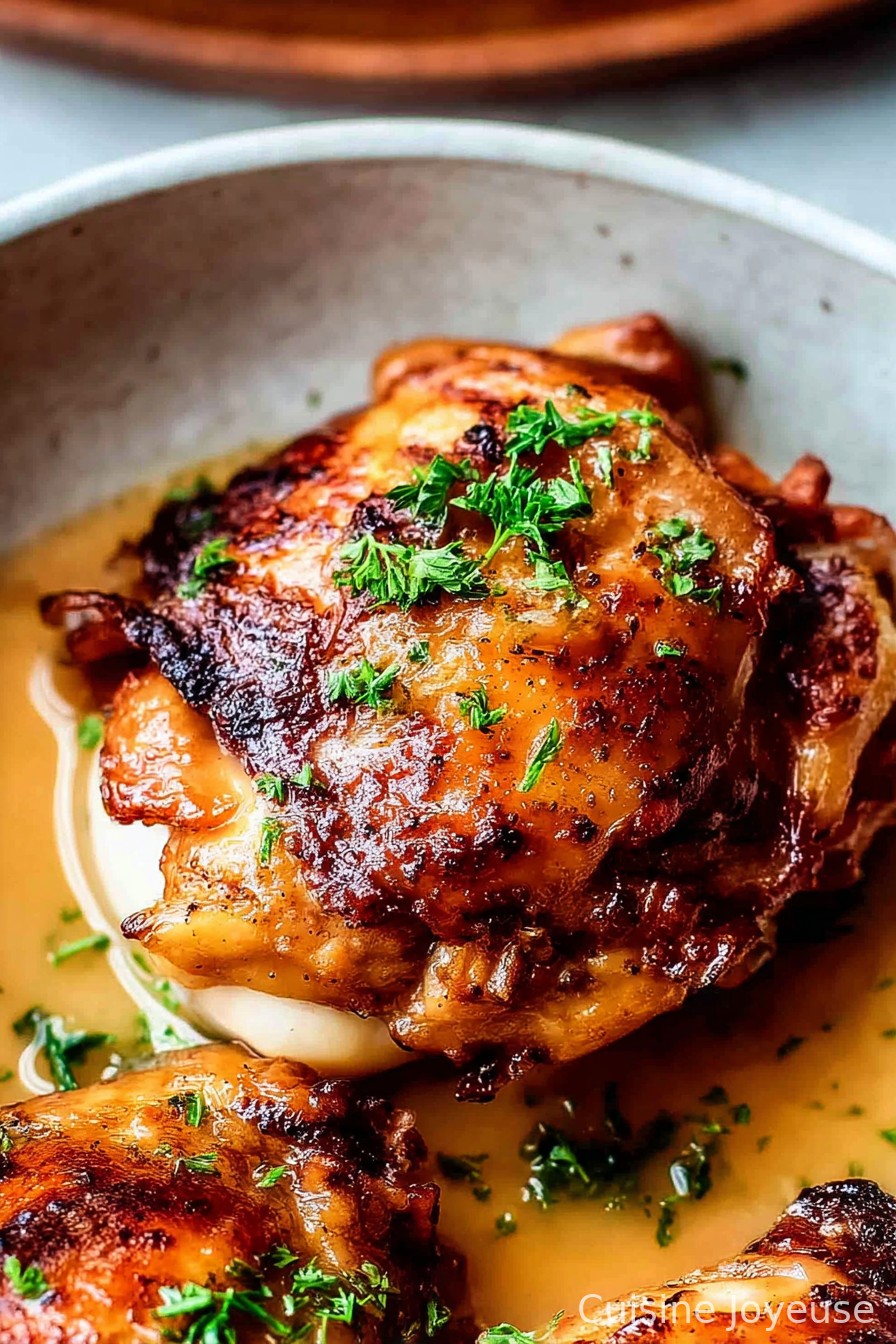
- If you want crisper skin, you can stick the chicken under a broiler for a couple of minutes. Or just eat as is because, honestly, dinner is ready and who’s judging?
- Spoon some of the broth over the thighs (this is where I sneak a taste). Serve hot, with whatever sides look good or are about to expire!
Notes (AKA Things I Learned The Wobbly Way)
- If you use frozen thighs, just add 3 more minutes to the cook time and skip browning—still tastes great but no crispy skin. Don’t ask how many times I’ve done this.
- If there’s too much liquid at the end, hit the Sauté button and let it bubble for a few minutes to thicken up—or, you know, spoon it over rice and call it a day.
- If you forget the paprika (which I’ve done a shocking amount), it really does taste different, so try not to.
Variations (Experiments—Both Genius and…Not)
- Swap in barbecue sauce for soy if you’re feeling a cookout vibe. I once tried ranch seasoning—honestly, not my favorite but the kids still ate it so go figure.
- I’ve added a handful of quartered mushrooms to the pot—they soak up the juices in a way that borders on magical.
- Lemon zest and a squeeze of juice can totally brighten things up (don’t overdo it or it gets weirdly tart—ask me how I know).
Is Equipment Really That Essential?
- Instant Pot (duh). But if you don’t have one, you can use any old pressure cooker—just mind the timing. My neighbor swears by her stovetop Dutch oven (longer cook, still tasty, but you might need to guesstimate if you’re like me and lose track of time).
- Tongs are handy but honestly, a fork works if you’re careful. I broke a plastic one once—won’t do that again.
Storing Leftovers (Ha, Like There Are Any)
Technically, you can keep these in an airtight container in the fridge for 3–4 days. Or so I’m told. In my house, anything resembling leftover chicken disappears by lunchtime the next day. If you’re one of those unicorn meal-preppers, freeze portions for up to 2 months. Just thaw and microwave (or put back in the Instant Pot for 2–3 minutes on Steam, though that seems very organized to me).
How I Like To Serve
If its a chill night, we just pile these onto a plate with a mess of steamed rice and maybe some pickled carrots (Vietnamese style, if I’m in that mood). My cousin insists mashed potatoes are non-negotiable—he might be onto something. Sometimes we turn leftovers into tacos. Actually, if you shred the meat up, it makes a mean chicken sandwich—just saying.
Lessons Learned (Read Before You Rush!)
- Trying to brown the chicken while the Instant Pot isn’t hot enough means the skin sticks and you’ll have to scrape. Patience is a virtue I rarely have, but here, it helps.
- Don’t forget the sealing ring! I did once and basically steamed my face. No chicken, just a mess.
- If you pile the thighs in too snugly, some spots won’t get as tender. On second thought, this never really ruined dinner, just made for chewy bits. Workable.
FAQ—Because People Actually Ask Me This
- Can I skip browning the chicken? Yea, you can, but the flavor’s a little less bold. Sometimes I just don’t have the time (or the willpower). It still comes out juicy though.
- Can I use chicken breast instead? You could, but it dries out quick—thighs are just way more forgiving. Still, breast works in a pinch—drop the cook time to 8 min, maybe add a splash more broth.
- Do I need to marinate ahead? Nope! The pressure kind of acts like a time bender and infuses flavor fast. But hey, if you marinate and forget about it, the flavor will get even deeper (I forget all the time).
- Help! Why is there so much liquid? Chicken thighs release a good bit of juice under pressure. I like spooning it over grains or, if I’m feeling ambitious, thickening with a cornstarch slurry (1 tbsp cornstarch + 2 tbsp cold water, stir in, cook a couple minutes—sorted).
- Can I double the recipe? Definitely, but don’t overfill the pot past the max line. You might want to add a minute or two to the cook time, but honestly, I usually just cook in two rounds. Keeps things from overcrowding.
Oh! And one random thing: once I tried tossing in a splash of pineapple juice. Even my skeptical aunt liked it. Cooking’s half experiment, half adventure, right? Enjoy your Instant Pot chicken thighs, may they be perfectly imperfect and delicious every time.
Ingredients
- 6 bone-in, skin-on chicken thighs (I’ve used boneless, skinless in a pinch, but those get less juicy. Up to you!)
- 1 tablespoon olive oil (or whatever’s handy—avocado oil works, too. My gran used lard but… that’s her style)
- 1 teaspoon kosher salt (table salt is fine—”salt is salt,” my uncle says, slightly incorrectly)
- 1/2 teaspoon black pepper
- 1 teaspoon paprika (smoked or sweet both go brilliantly, or swap in chili powder for some bite)
- 1 teaspoon garlic powder (I’ve thrown in fresh minced garlic before—tastes a bit sharper, which is nice and chaotic but leaves bits in the sauce. Up to you!)
- 1/2 teaspoon onion powder
- 1 cup chicken broth (I sometimes mix in water if I’m running short; it still works—just a bit less traditional)
- 1 tablespoon soy sauce (or Worcestershire sauce for a deeper flavor—truthfully, I’ve mixed them by accident, and it was actually good.)
Instructions
-
1Pat the chicken dry with paper towels. Not mandatory but gives you crispier skin (sometimes I’m too impatient and just skip to step two. Still edible!).
-
2Mix the salt, pepper, paprika, garlic powder, and onion powder in a little bowl. Sprinkle this all over the chicken thighs. Massage it in, unless raw chicken freaks you out—use tongs if that’s your vibe.
-
3Set the Instant Pot to “Sauté” and add the olive oil. (If your Instant Pot doesn’t have Sauté, just turn it on for a minute to heat things up.) Place the thighs skin-side down in the pot—work in two batches if you have to. Brown them for about 2–3 minutes per side. Don’t panic if they stick a little, they’ll loosen.
-
4Take out the browned thighs and set them aside. Now, pour in about a quarter of the chicken broth and scrape the bottom with a wooden spoon. This is called “deglazing” but I just call it getting the crispy bits, which are honestly the best part.
-
5Put the chicken thighs back in, skin-side up. Pour in the rest of the chicken broth and drizzle over the soy sauce. If some thighs are sitting awkwardly – it’s fine, just squish ‘em in.
-
6Lock the Instant Pot lid, set the valve to “Sealing,” and pressure cook on High for 10 minutes. (If using boneless, you can get away with 8 minutes but I usually forget and it comes out fine.) The pot will take a few minutes to come to pressure – use the time to, I dunno, do some kitchen dancing or answer work emails or whatever.
-
7When the timer beeps, let it sit for 5 minutes (this is called natural release. One time, I skipped it and ended up with very excitable steam. Just let it chill a bit.) After that, take care flipping the valve for a quick release—watch out for the steamy whoosh.
-
8If you want crisper skin, you can stick the chicken under a broiler for a couple of minutes. Or just eat as is because, honestly, dinner is ready and who’s judging?
-
9Spoon some of the broth over the thighs (this is where I sneak a taste). Serve hot, with whatever sides look good or are about to expire!
Approximate Information for One Serving
Nutrition Disclaimers
Number of total servings shown is approximate. Actual number of servings will depend on your preferred portion sizes.
Nutritional values shown are general guidelines and reflect information for 1 serving using the ingredients listed, not including any optional ingredients. Actual macros may vary slightly depending on specific brands and types of ingredients used.
To determine the weight of one serving, prepare the recipe as instructed. Weigh the finished recipe, then divide the weight of the finished recipe (not including the weight of the container the food is in) by the desired number of servings. Result will be the weight of one serving.
Did you make this recipe?
Please consider Pinning it!