Baked Buffalo Chicken Taquitos
Let Me Tell You Why These Baked Buffalo Chicken Taquitos Took Over My Snack Game
You ever get the urge to whip up something so good, everyone ends up hanging around the kitchen just plucking it fresh off the tray, grumbling about how hot it is? That’s literally what happened the first time I made these Baked Buffalo Chicken Taquitos. I’d promised my little brother some ‘proper snacks’ for movie night — and, as usual, overestimated how much my oven could handle without setting off the smoke alarm. Don’t get me started on the time the parchment paper curled up and nearly caught fire. (Pro tip: always check if the oven rack is in the right place before you start!)

But honestly, that little chaos was totally worth it, because now, these taquitos basically have to make an appearance at every family hangout, and my friends keep texting for the recipe — so, here we are!
Why You’ll Love This (Just My Two Cents, Really)
I make this whenever the fridge has leftover rotisserie chicken (or let’s be honest, any excuse — I’m that predictable). My family goes crazy for these because they’re all tangy-spicy without being straight-up fire, and you actually get to use your hands to eat. My sister tries dipping them in ranch, which I used to judge, but actually (don’t tell her) it’s kind of awesome.
Also, I used to fry taquitos (let’s just say my kitchen walls learned the hard way), but switching to baking actually means more can go in at once — plus, way less cleaning up oily splatters. And, full disclosure, I’ve botched the rolling step a few times and they still came out pretty delicious, so don’t stress.
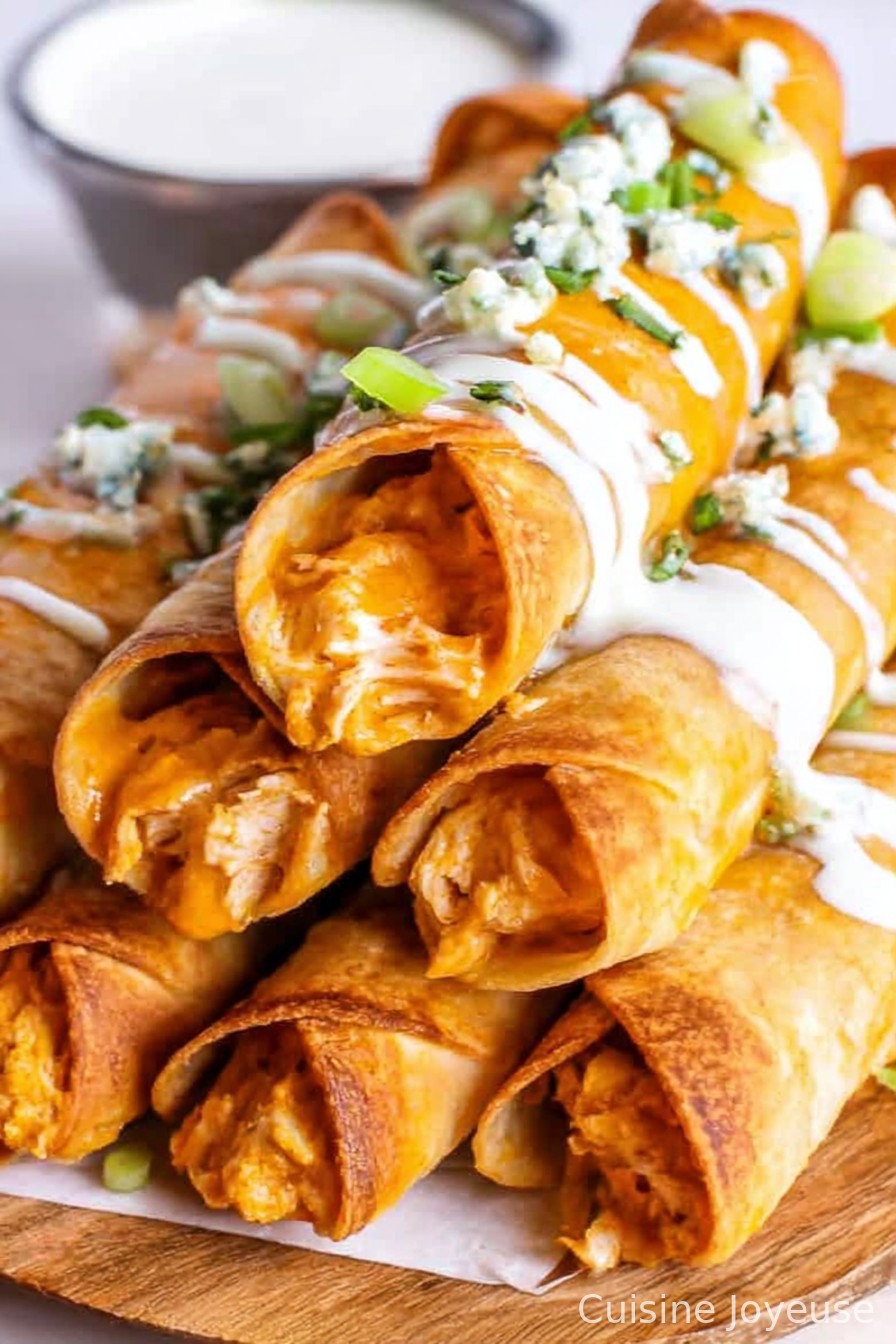
What You’ll Need (Mostly Things You Might Already Have)
- 2 cups cooked shredded chicken (rotisserie works — or use leftover grilled, or even canned in a pinch, but shh, don’t tell my mom I said so)
- 120g (about 1/2 cup) buffalo sauce (I reach for Frank’s RedHot, but honestly, whatever’s on hand. Once I tried a random “wing sauce” from Aldi. It was grand… but spicier than expected!)
- 120g (1/2 cup) cream cheese, softened (full-fat is creamier, but I’ve used low-fat when “starting again on Monday”)
- 1 cup shredded sharp cheddar (I’ve swapped in Monterey Jack or whatever was lingering at the back of the fridge)
- 2 green onions, sliced (totally optional, sometimes I skip it if my local shop’s got sad-looking veg)
- 1/2 teaspoon garlic powder (could use fresh, but then you need to chop things… meh)
- 1/2 teaspoon smoked paprika (or regular, or just leave it out)
- 8-10 small flour or corn tortillas (flour are softer, but I like corn for a bit of chew; use what you like)
- Cooking spray or a little oil for the tray (I’ve gotten lazy and just brushed on olive oil once or twice, works fine)
How I Make Baked Buffalo Chicken Taquitos (Not Always in the Same Order… But Close Enough)
- Preheat your oven to 400°F (well, 200°C for us metric folks). Line a baking sheet with parchment. Or foil — honestly, whatever prevents stuck-on cheese.
- In a big bowl, mix up the shredded chicken, buffalo sauce, cream cheese, shredded cheese, green onion, garlic powder, and paprika. I usually start with a spoon, but end up just squishing it by hand because it’s waaaay faster. This is when I sneak a taste (nobody ever knows).
- If your tortillas are a bit stiff, microwave them under a damp towel for 20 seconds — makes rolling much less…cracky?
- Scoop a spoonful (call it a heaping tablespoon) onto a tortilla, roll it up like a little log (not too tight — things get messy), and place seam-side down on the baking tray. Repeat till you run out of filling (or patience — sometimes I switch to just folding them like lazy tacos).
- Spritz the tops with cooking spray or brush with oil. Don’t skip this, unless you love dry taquitos.
- Bake for about 15–18 minutes. Edges should get golden and a little crisp. Sometimes mine look a bit pale — I pop on the broiler for a minute (but watch closely, I have burned three in a row on a phone call once…)

Notes Yaknow Picked Up The Hard Way
- If the mixture seems too runny, pop it in the fridge for 5–10 min. (I learned this after chasing filling across my counter.)
- Corn tortillas break easier — just microwave them longer or try flour. Actually, I think they both taste great cold, but corn’s a bit sturdier for lunch on the go.
- Baking time really depends on the oven; my old one ran hot, so I’d shave two minutes off and check. New oven, I actually have to add time.
Some Things I’ve Tried (and a Couple That Flopped)
- Once swapped in pulled pork for the chicken — honestly, it was too rich for me, but my neighbor loved it.
- Shredded mozzarella instead of cheddar: tasted good, but didn’t crisp up the same (I sorta missed the sharp edge of cheddar, but hey, cheese is cheese).
- Tried adding diced jalapeños for “extra adventure” — kids were unimpressed, but the grownups fought for the spicy ones.
- Once I tried stacking them all against eachother in the tray. Would not recommend: soggy sides!
Kitchen Gear (But Skip What You Don’t Have)
- Baking sheet (cookie tin, or even a pizza tray if that’s what’s clean)
- Parchment paper/foil — otherwise, a good lick of oil on the tray and a solid spatula gets most of it up
- Mixing bowl (used a big pot before — works fine!)
- Microwave for softening tortillas; but once, in a tiny caravan, I just held each over a gas hob for a tick. Not recommended if you’re easily distracted.
How I Store (or Rarely Do, Let’s Be Honest)
Technically you can keep these taquitos in an airtight container in the fridge, and they’ll last 2–3 days. I’ve heard you can freeze them, wrapped up in foil, and reheat from frozen at 350°F for about 15 minutes. But honestly, in my house it never lasts more than a day — the kids nab them for after-school snacks and I’ve only ever found a single, sad half-taquito by the next morning.
How We Like To Serve ‘Em
I’m a blue cheese dip gal (don’t @ me), but the rest of the crew piles the ranch high. Sometimes I do both, if I’m feeling wild. We’ll do celery sticks on the side if I remember, and once in a blue moon — we make these taquitos the star, paired with corn on the cob and a big salad, then call it dinner and feel fancy for about five minutes.
Some Pro Tips Learned the Clumsy Way
- Don’t overfill; seriously, it’s tempting, then you get a cheesy mess all over the pan and half-empty tortillas. I once tried to jam extra in “to save time”… nope.
- Rolling with slightly-warm tortillas actually helps — cold ones tear like nobody’s business. I’ve rushed that step and always regretted it.
- Keep the seam-side down or they like to unspool and try running away.
FAQ — For Real, People Ask These
Can I make these ahead?
Yep, just fill and roll them, pop in the fridge covered (up to a day), then bake when you’re ready. Sometimes I think they get even tastier after the flavors hang out together.
What sauce is best?
Whatever buffalo sauce is nearby (I’m not loyal to one, but my aunt swears by Frank’s). If you’re heat-sensitive, look for “mild” — some of them breathe fire. They all seem to work, though.
Can I air fry these?
Tried it — 375°F for about 6-8 minutes. Turns out great if you don’t overcrowd. Funny enough, they get even crisper than the oven sometimes, but you have to do multiple batches if you’ve got a smallish air fryer.
Is ranch dip required?
No rules here! My cousin uses sour cream, my mum prefers yogurt, and I’ve even seen someone use ketchup (was not for me, but I won’t judge).
Flour or corn tortillas — which one wins?
Battle of the ages — I swing both ways, but flour is easier for rolling. (Mum always shouts for corn, so we just make both now.)
Anyway, if you end up with leftover filling (rare), tip it over nachos or even stuff peppers — learned that little trick when I ran out of tortillas and couldn’t be bothered to go out again. Enjoy, and let me know if you come up with some wild twist (or discover a new way to burn yourself on melted cheese — it’s like a rite of passage, right?).
Ingredients
- 2 cups cooked shredded chicken
- 1/2 cup buffalo wing sauce
- 4 oz cream cheese, softened
- 1 cup shredded cheddar cheese
- 1/4 cup chopped green onions
- 8 small flour tortillas
- 1/2 teaspoon garlic powder
- 1/2 teaspoon onion powder
- Nonstick cooking spray
Instructions
-
1Preheat oven to 400°F (200°C). Line a baking sheet with parchment paper and lightly coat with nonstick cooking spray.
-
2In a large bowl, mix together shredded chicken, buffalo wing sauce, cream cheese, cheddar cheese, green onions, garlic powder, and onion powder until well combined.
-
3Spoon 2-3 tablespoons of the chicken mixture onto the lower third of each tortilla, then tightly roll up and place seam side down on the prepared baking sheet.
-
4Lightly spray the tops of the taquitos with nonstick cooking spray.
-
5Bake for 15-18 minutes, or until the taquitos are golden and crispy. Serve hot with your favorite dipping sauce.
Approximate Information for One Serving
Nutrition Disclaimers
Number of total servings shown is approximate. Actual number of servings will depend on your preferred portion sizes.
Nutritional values shown are general guidelines and reflect information for 1 serving using the ingredients listed, not including any optional ingredients. Actual macros may vary slightly depending on specific brands and types of ingredients used.
To determine the weight of one serving, prepare the recipe as instructed. Weigh the finished recipe, then divide the weight of the finished recipe (not including the weight of the container the food is in) by the desired number of servings. Result will be the weight of one serving.
Did you make this recipe?
Please consider Pinning it!!